
In the meantime my hobby activity has been limited to a couple of games of Kings of War with Tim, who basically hadn't played the game properly before. Both games were with my Kingdoms of Men and Ogres. The first time I used the Ogres, and I lost. The second time I used the Men, and this time I actually took photos. I figured I might as well share them here. Let's see if I can remember what happened based on these pictures...
The first game we had used pretty normal sized lists. This time we had more models with us so we decided to up the game size to 3000 points. More toys for us!
My list: Kingdoms of Men (3000 points)
- Horde of Foot Guard with 2-handed weapons and Blessing of the Gods
- Horde of Heavy Pike with Brew of Strength
- Horde of Heavy Pike with Hammer of Measured Force
- Legion of Militia with Brew of Sharpness
- Legion of Militia with Banner of the Griffon
- Horde of Berserkers
- Horde of Arquebusiers with Jar of the Four Winds
- Regiment of Knights with Potion of the Caterpillar
- Regiment of Knights with Brew of Haste
- Troop of Mounted Scouts with Pistols
- Troop of Mounted Scouts with Carbines
- Siege Artillery
- Siege Artillery
- General on a Horse with Blade of Slashing
- General on a Horse with Mace of Crushing
- Army Standard Bearer on a Horse with Lute of Insatiable Darkness
- Wizard on a Horse with Bane-Chant and the Inspiring Talisman
Tim's list: Ogres (3000 points)
- Horde of Warriors
- Horde of Warriors
- Horde of Siegebreakers with Brew of Haste
- Horde of Siegebreakers with Blade of Slashing
- Horde of Shooters
- Horde of Boomers with Blessing of the Gods
- Horde of Red Goblins
- Regiment of Red Goblins
- Troop of Red Goblin Scouts
- Troop of Red Goblin Scouts
- Warlord on a Chariot with Dwarven Ale
- Warlord on a Chariot
- Boomer Sergeant with the Inspiring Talisman
- Grokagamok
- Mammoth with Ballista
- Giant
Given that I didn't have the Clash of Kings 2018 book on hand, we chose a scenario from the CoK 2017 book. It was Capture or something, where you had to control all the terrain pieces at the end of the game. Given the size of our hills, we decided to ignore those. So the fight was to control the walls, buildings and forests.
<EDIT: I've just noticed that Blogger seems to be locking down images do you can't click to make them bigger when I use captions. I'm moving the caption text outside the images for now. Can't be bothered digging at code to find another way around it now>

All lined up.

My army was pretty funny. I had never tried Militia before. My Halberdiers were standing in for the experiment. There were an awful lot of models in my list. I really had no idea what my plan was...

Tim's flanking force hard on my right flank. The Goblin drops in his list meant he did a reasonable job of out-deploying me.
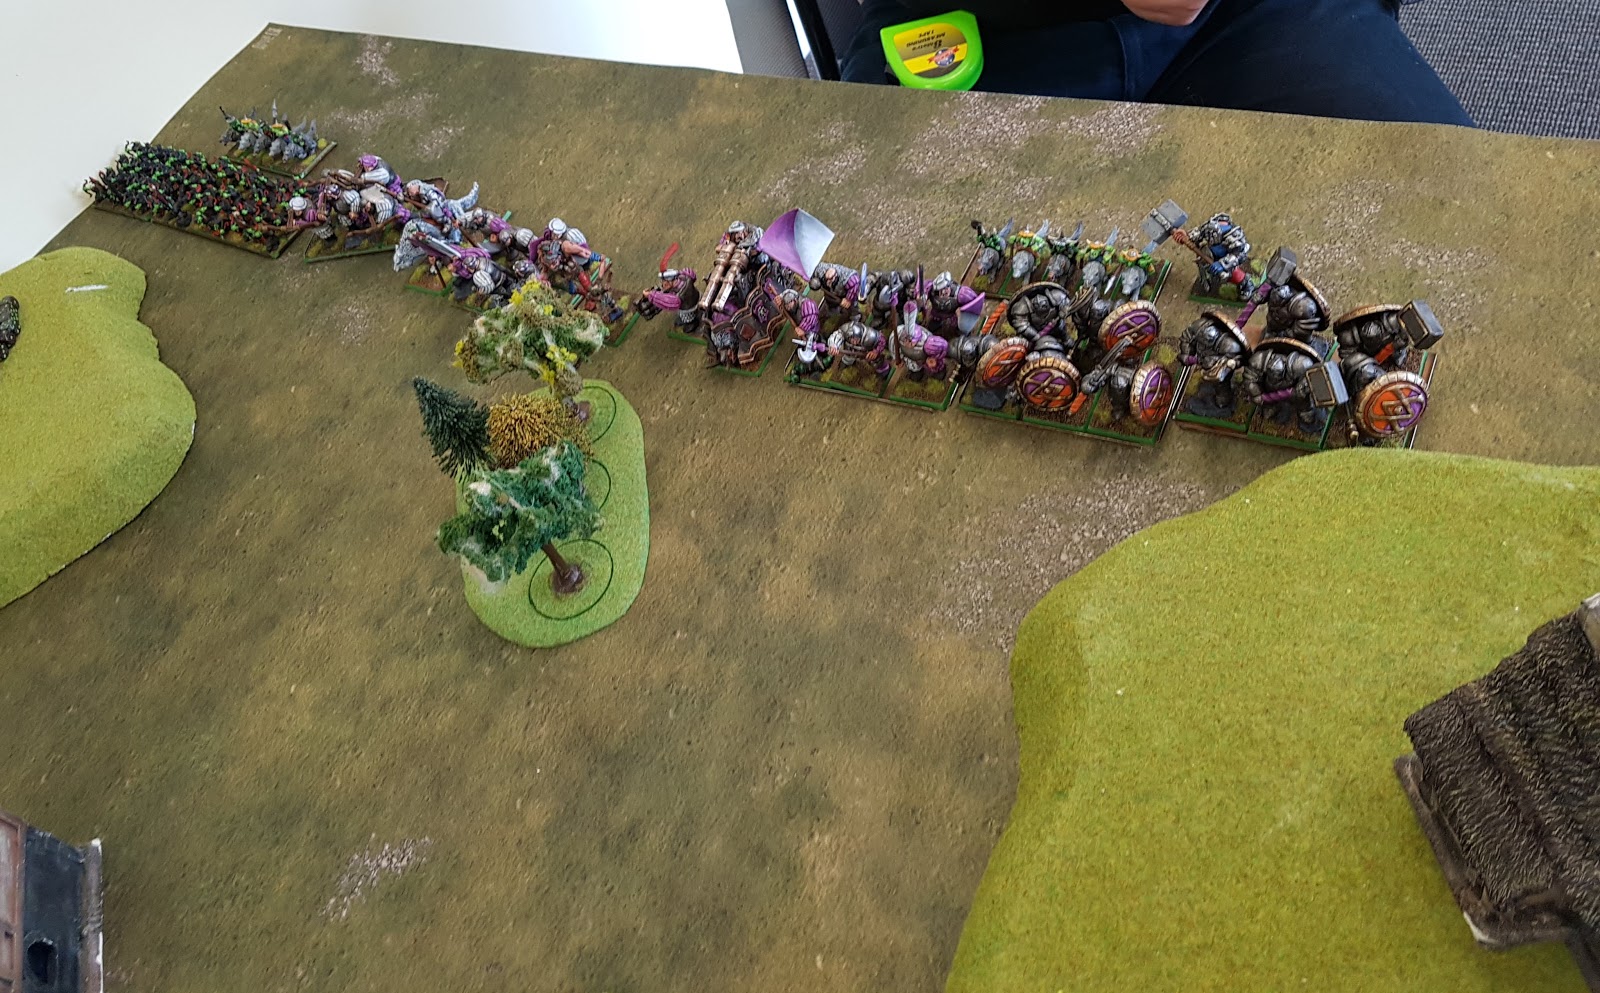
The main bulk of Tim's forces.

Siege Breakers, Grokagamok... That is a strong centre.

So many Goblins on the flank. I had never gotten around to trying them in an Ogre list. This bigger game seemed like a good chance to include them.

I had plenty of stuff on my left flank, but it didn't take long for me to decide that I should have included some more cavalry in the list. I lacked speed and my lines felt very unwieldy and static.


I got the first turn and moved up a bit, particularly on the right. I needed to get the Knights out from behind the Arquebusiers, who managed to keep a clean line of fire on the Mammoth and scratched it up a bit. My Siege Artillery began a proud tradition of missing every turn. Well, they did land a hit at one point. Turn 5 or something. If I notice when that was, I'll let you know.


Not really sure what I was hoping to achieve on the left. I moved up a bit, but didn't have a clear plan. I was immediately unhappy with how I had positioned the Knights. Chances were they would only really want to move through the Militia when they were ready to charge, and you can't pass through your units when you're actually charging. Moving clean through before then would just see them being the unit receiving a charge. It was basically bad deployment.


In Tim's turn the Boomers advanced and opened up on my Militia, doing 8 damage. The Warlord in his chariot moved around to the flank. The Red Goblin Scouts were given the highly undesirable job of interfering with the charge of my Knights whilst the Siegebreakers moved up menacingly behind them.

The Mammoth moved into the forest, which made me regret my choice of target in the first turn. I wouldn't want to waste the shots from the Arquebusiers on them when they were in cover. I should have picked a target that would remain a good target the following turn. Of course if the Siege Artillery had ever hit (being indirect fire they ignore cover), it might have solved the issue. Oh well.

I had hoped Tim would move up on my left and make my decision making a bit easier. Instead he sat back and started bombarding my Heavy Pike with shots from the Shooters and Red Goblins. 8 damage on them too. That was going to add up quickly...

In my second turn I decided I had little choice but to clear off the Red Goblin Scouts with the Knights, although they were clearly doomed in Tim's turn. The Militia milled about unconvincingly, at least trying to keep everyone in their front and wondering how they were going to get out of this situation. Their job was theoretically to buy time, but there wasn't really likely to be any help forthcoming.

My Heavy Pike moved up to try to punish the Siegebreakers if they all committed against my poor Knights. The Berserkers kept pace, allowing me to maintain a relatively solid battle line.

The Militia moved up. I figured I needed to do something about the damage the Pikemen nearby were already taking. I couldn't just sit back and wait; Tim had more firepower on that flank. I moved the Mounted Scouts with carbines up in front of the Pikemen. It would give them cover and allow me a chance to try to do some ranged damage in return fire. I hoped. I think I did a few wounds to the Shooters.

The view from Tim's side of the table. I think someone told me I was giving a very one-sided perspective.


Right, so now that we're back in the shoes of the good guys, it was Tim's turn. Things got charged. He didn't really hold back on the right. The Boomers and Warlord both engaged the Militia.


Yeah, see this? This is not how you use Knights.

OK, he didn't really hold back on my left either. That's another Warlord, a horde of Warriors and a Giant. My poor Militia. At least they were fresh....

The other Red Goblin Scouts decided to make a nuisance of themselves by sitting right in front of the Mounted Scouts. Shooting then rained in doing a couple more wounds to the Pikemen. So at least my plan of giving them cover helped a bit.

The combats over on my right went about as well as you would expect. The Militia and Knights both folded. I did not have a lot with which to stop those Ogre units now.

Tim's advance right in the centre was a little more cautious than the rather comprehensive charges on either flank.

For their part, my Militia on the left did not rout. I'm pretty sure they wavered, though. So now they were in everyone's way!

Turn 3: The Kingdom Strikes Back! My General moved up to block the Boomers whilst the Arquebusiers fired into them in an act of self-preservation. The Heavy Pikemen charged the Siegebreakers, who had turned to face them after disposing of my Knights.

The Militia on the left were wavering, but the Berserkers saw an opportunity and flanked the Giant. That's a lot of attacks, and I think I successfully cast Bane-Chant...

I saw little choice but to charge the Red Goblin Scouts with my Mounted Scouts, with the General in alongside. He was my real hope, but between them they only did enough to waver the Goblins. There was an Ogre Warlord keeping an eye on them nearby, of course. So they were "inspired" (read: "motivated").

The Pikemen had the Hammer of Measured Force, but were never likely to actually rout a horde of Ogres in a single charge. They weathered the charge, but I think I might have wavered the Boomers with my shooting. So that was something.

The Giant found the Berserkers swarming his flank a bit much and routed, allowing them to reform to face the various approaching threats.


In Tim's third turn, he apparently took exception to the behaviour of my Heavy Pikemen. At least Grokagamok there didn't join the party. He had an appointment elsewhere.

This was the appointment. Grokagamok joined the Warriors and the Boomer Sergeant in charging my Berserkers, who had clearly taken some shooting damage in the previous turn. I think the Shooters had changed targets when I found cover for the Pikemen on the hill, and the Boomer Sergeant was already in the area.

The Warlord and Warriors had a second crack at the wavering Militia.


Unsurprisingly, the punishment proved too much for the Militia...

...and the Berserkers... But the Heavy Pikemen held their ground in the face of the triple charge from the Siegebreakers and flanking Warlord Chariot, thanks largely to their pikes protecting the front and the forest shielding their flank. They did waver, however. That was unfortunate.

In my fourth turn my General decided that the Boomers looked a little shaky and heroically charged them all by himself.

On the left my Knights found a clear path and charged the Warlord in his chariot. The General on the hill charged the Red Goblin Scouts again, however my Mounted Scouts had taken some shooting damage and were wavered. Which meant my Pikemen were still trapped behind this nonsense. I felt I was fumbling that area pretty terribly.

I don't seem to have taken a decent picture, but the other combat of note was the Foot Guard charging over the wall and into Grokagamok. Rather impressively they routed him straight up, then backed off behind the wall to await Tim's response. The Arquebusiers couldn't get a clear line to the damaged Siegebreakers, so settled for firing at the Warlord right in front of them.

Things are now looking a little thin in my centre.

Well at least those Red Goblin Scouts were gone. Now I could go back to being shot by Tim's troops without interruptions!

Looking to avenge Grokagamok, the Warriors and Mammoth charged over the wall and into the waiting Foot Guard.

My Heavy Pikemen had fought bravely, but a second charge by all three of their assailants proved too much for them.

Thanks partly to the hindered charge, the Warriors and Mammoth did a thoroughly underwhelming amount of damage to the Foot Guard.


The glorious charge of my Knights proved to be short-lived, as the Warriors helped the Warlord to dispose of them before they could strike again. My Mounted Scouts also disappeared thanks to another volley from Tim's shooting.

It was now my fifth turn, and I had some catching up to do if I wanted to be able to control enough objectives to actually make the result a contest. My Arquebusiers fired into the already damaged Siegebreakers and routed them, whilst my Wizard bravely rode out to block the advance of the other unit. My General charged into the flank of the Warlord. He had some hope of wavering him, given he was already damaged.

The Foot Guard decided the Warriors were the greater threat and counter-charged them, routing them and leaving the Mammoth without support.

On the left, my General went on a quest to silence the largest of the shooting Goblin units for a turn. He did a few wounds, so mission accomplished for now.

My remaining Mounted Scouts moved up to block the next turn of charges, whilst the Pikemen moved up and hoped to somehow survived another volley of shooting. That's 15 damage on them already...

My General's attempt to slow down the Warlord was a failure, and so he ignored my character and charged the Arquebusiers, whilst the Siegebreakers swatted the Wizard for getting in their way.

Being rather pessimistic about his chances after the effort of the previous turn, Tim decided not to charge with the Mammoth again, and instead fired its Ballista into the Foot Guard whilst the Shooters on the flank assisted.

My efforts to block charges with the Mounted Scouts met with limited success. The Warriors charged them, but the Warlord found a way past and went in to finish off the Pikemen. This was why freed up the Shooters to fire at the Foot Guard. The Pikemen were being "handled"... Except that this proved to be untrue when the Warlord rolled poorly, and then Tim managed to roll a double 1 for the nerve test! The Pikemen liiiived!!

Right. My sixth turn. Serious business now, as it could be my last turn. I needed to clear out the Warlord to help me lay claim to the forest, so charged with both the General and Arquebusiers, and hoped for the best.


The Foot Guard took exception to being shot, and flanked the Mammoth. It did not survive.

In a state of shock at not being dead, the Pikemen counter-charged the Warlord whilst my Army Standard moved to block the Warriors and the General again went into the horde of Red Goblins.

Unfortunately my efforts to rid myself of the Warlord failed. He held his ground, despite the awesome combat prowess of my Arquebusiers... OK yeah, maybe I didn't deserve to move him.

Having disposed of the Mammoth, the Foot Guard turned toward the Boomer Sergeant who at that point controlled the building. This unit was key for me now. They could contest or claim multiple terrain pieces in that area. But they had taken 12 damage...

The Pikemen managed to rout the Warlord, but only controlled a wall and were in danger of vanishing the next time they took any damage.

Having failed to clear out the Warlord, in Tim's 6th turn my Arquebusiers now had to contend with the Siegebreakers. Oh well, they were hindered. Maybe they would just miss...

...Or not. Oh well. At this point the forest was lost, even if I had another turn. I don't think I had wounded these Siegebreakers, so even a hit with the artillery (implausible as that would have been, given my record) would not have sufficed to move them.

On the left flank, somehow my Pikemen were still alive. I think Tim contented himself with trying to ping a wound off them with the Red Goblin regiment, and then failed to do so. The Shooters and Boomer Sergeant were busy trying to get rid of my Foot Guard. I don't recall if he succeeded, but he might have. Either way, this was how the game ended.
I was hoping for a 7th turn, however Tim rolled the dice and the game ended. Honestly I had a feeling I could contest more stuff, including clearing off those Warriors who had bounced off my Army Standard Bearer with the Pikemen. The downside was that they would almost certainly have then been shot off, and I had too little left to claim things, even if I was doing a solid job of taking away what Tim could use in return.
It was a game where I felt like I had failed a little in my army selection, then in my deployment, and then spent the rest of the game trying to catch up. The list needed more agility; it was too dependent upon large formations of infantry. I remain unconvinced by artillery. 1 hit in 12 shots is pretty depressing. I know what a hit from artillery can do, but I also know that I might never get to see that occur in any given game.
All in all it was an entertaining game. I'll get you next time, Tim!
I play almost exclusively KoM and in the last year I've moved nearly entirely away from War Machines and infantry based shooting. I never regret the extra drops, and I've made up the shooting elements somewhat with mounted scouts, Pegasus wizards and cheap heroes with items
ReplyDeleteI find mounted shooting so unimpressive in terms of its damage output for the points spent. I don't know, really. I felt like the Arquebusiers did a pretty good job. It was mainly the artillery that let the side down. I much prefer a unit like Ogre Shooters over artillery - more shots that hurt a bit less. At least you feel like you're generally going to land a few hits each turn. If I keep using the KoM I'll look into the options.
Delete