It had been several weeks since I had made it down to the games club for long enough to actually play a game, and I decided I was ready to try to put together another battle report. Unfortunately I decided this the day beforehand, so I didn't exactly leave myself (or anyone else) a lot of time to get organised. This was my first mistake - I need to remember that these things take time if they are to be done correctly.
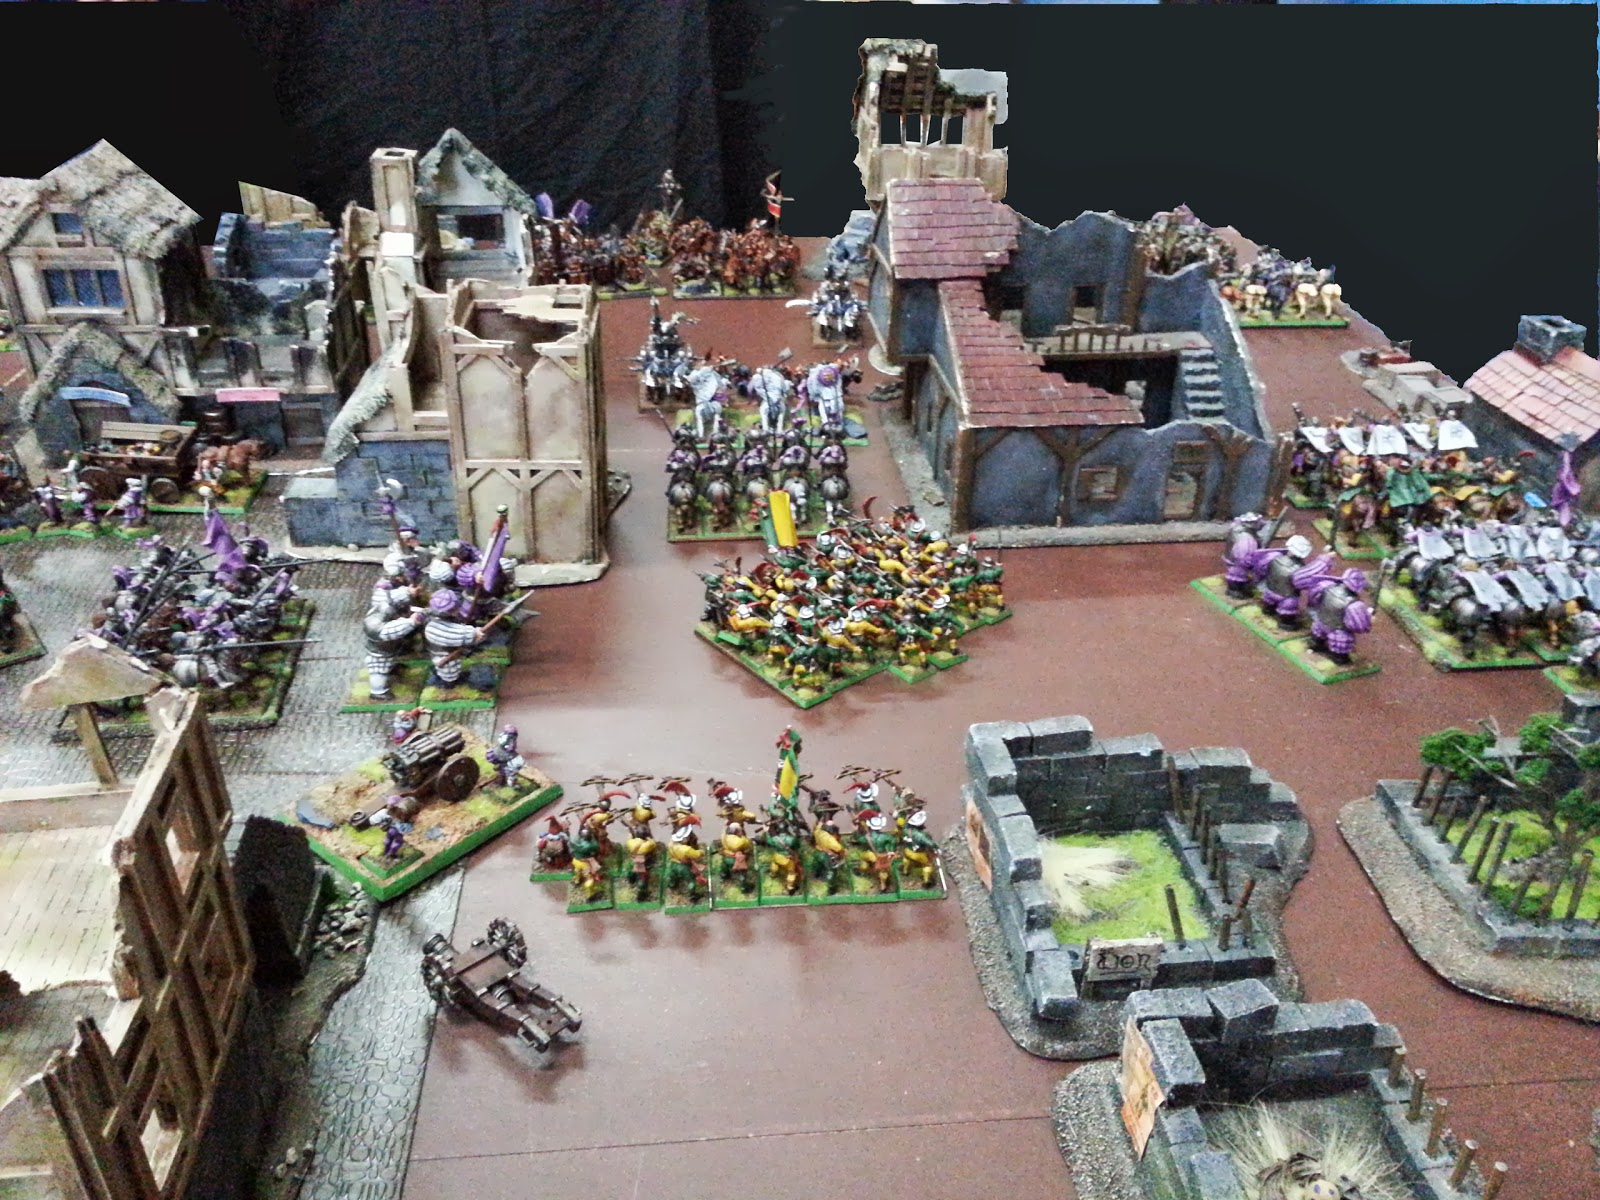
Despite the narrow time-frame, I did manage to throw together some scenario rules to make the game a bit more interesting. I have wanted to try a battle fought on the streets of a city for a while, and decided this was a good opportunity. I added a couple of objectives to try to give the game some focus, and I figured we were basically good to go. However, I made these decisions based on rough guesstimates of our terrain resources at the club, which was really a mistake when I was forming plans around such a terrain-intensive approach. We'll call that my second mistake.
And finally, I was laying out these plans with a rough idea of the armies being perhaps 4,000-5,000 points in size. It wasn't a firm number, and I let myself be talked up to 8,000 points on the Friday evening as we threw together some lists for the next day. I blame Benji - he preyed upon my weakness for larger games and the temptation overrode my better judgement (and I didn't really think through the potential consequences). This was my third mistake.
To be honest there was even more wrong with my approach than these 3 things, but 3 major mistakes seems like enough blame for one day. Suffice to say the game didn't quite work out the way I would have liked.
My opponent was to be Nick Cook, King of Proxies. Obviously an army of unpainted proxies was not exactly what we were after for a battle report, so I called on a couple of the guys who actually have painted Chaos armies to bring around some of their stuff. The generous providers of the Chaos hordes were Benji and Owen. This is how Benji got involved in the process and started whispering tricksy things in my ear about making the game a "proper" size. I should never have succumbed...
For my part, I originally planned to just use Empire stuff. But then it occurred to me that I liked the idea of a couple of units of matching Ogres stomping down the city streets and so I slipped a small allied force into the list (rather than using them as unit fillers as is their usual role). I didn't bother with a general for the contingent as I don't yet have a good themed model painted up for the job. But that was OK, the Ogres were really just a token inclusion anyway. I ended up using the vast majority of my Empire infantry, although plenty of cavalry got left behind due to a lack of command models (I generally have 2 command groups per mob of 40, as I don't tend to expect to need more than 2 units of a given type of Knight (White Wolf, Panther, Venator or Reiksguard)).
I called the scenario "The Trader and the Temple" after the two main objectives in the game. The general idea was that a simple trader had stumbled upon a powerful artefact that was actually something akin to a Soulstone from Diablo - a gem that contained the trapped essence of a Daemon Prince. And another Daemon Prince was leading an attack on the town in an attempt to free his brother.
The Trader
Samawan ibn Anathar is a trader from Araby who has arrived in town looking to sell a magical talisman. Unfortunately it is not simply the lucky charm he took it for, and has attracted the covetous eyes of the Chaos powers.
Samawan is deployed in the Town Square at the beginning of the game, under the control of the Empire player. He can move around freely, however he may not enter any buildings as the occupants will refuse him entry.
Samawan has the statistics of an Empire Master Engineer. His talisman grants him a 4+ ward save. However, if he is slain in close combat the energy in the talisman will explode, causing a strength 4 hit to all models within 6”. Samawan will then be replaced by a Daemon Prince under the Chaos player’s control, in the same manner as if he had rolled a 12 on the Eye of the Gods chart. The summoned Daemon Prince is worth no victory points.
At the end of the game, the Empire player gains 1000 bonus victory points if Samawan is still alive. The Chaos player gains 1000 bonus victory points if Samawan became a Daemon Prince. Neither player gains any bonus points if he was slain out of combat (and hence did not transform).
The Temple
The Slaanesh temple had long been hidden within the bowels of the city trade hall, however its presence was revealed when the building above it was blown apart in a blast of magical energy as the cultists within unleashed their vile sorceries.
The Chaos player can deploy up to 3 Infantry units in base contact with the temple at the start of the game.
In addition, the cultists within the temple are continuing their rituals. Each turn the temple may cast a bound spell (power level 5). If successfully cast, D3 unengaged Chaos units anywhere on the table may be removed and placed in base contact with the temple, in the same formation and facing any direction. This is powerful and dangerous magic, however – if the spell is cast with Irresistible Force, after the unit is placed the temple is destroyed by the uncontrolled magicks. Replace it with a suitable set of ruins.
Chaos units within 6” of the temple gain the Armour Piercing special rule.
The temple is a building and follows the normal rules for buildings. If an Empire unit enters the building, it is immediately destroyed and replaced by a suitable set of ruins.
At the end of the game, the Empire player gains 1000 bonus victory points if the temple has been destroyed. The Chaos player gains 1000 bonus victory points if the temple still stands.
The Table
The game should be played on an 8’x6’ table. The Town Square is in the centre of the table, and should be a clear space approximately 24" across, potentially with a statue, fountain or other object of interest in the middle. The Town Square should have 4 streets running into it, and the rest of the table should consist of a layout of streets and buildings (either ruined or intact). The streets should all be around 6" wide (giving some room for 5" wide units to wheel), and units are permitted within 1" of the buildings on either side to make things simple. There should be a relatively direct route from the Temple to the Town Square.
All buildings (other than the Temple) are considered impassable terrain unless otherwise agreed by the players (signifcant buildings may be an exception). Units pursuing and fleeing will adjust their direction to go straight down streets (in the direction closest to their correct path. Roll a dice if the choice of direction is not obvious).
 |
| The rough layout of the table |
The Turn
The Empire player gets the first turn. The game will go for 6 turns.
The Armies
The final lists were:
Warriors of Chaos
- Daemon Prince of Nurgle
General, Magic Level 4 (Lore of Nurgle), Chaos Armour, Daemonic Flight
Scaled Skin, Soul Feeder, Charmed Shield, Sword of Striking, Dragonbane Gem, Flaming Breath
- Chaos Lord of Tzeentch on Daemonic Mount
Barding, Chaos Armour, Shield, Talisman of Preservation, Third Eye of Tzeentch, Ogre Blade
- Sorcerer Lord of Slaanesh
Magic Level 4 (Lore of Slaanesh), Chaos Armour, Earthing Rod, Ironcurse Icon
- Exalted Hero of Tzeentch on Chaos Steed
Halberd, Chaos Armour, Shield, Barding, Battle Standard, Talisman of Endurance, Potion of Toughness
- Exalted Hero of Khorne on Daemonic Mount
Halberd, Barding, Chaos Armour, Dawn Stone, Helm of Many Eyes
- Exalted Hero of Khorne
Chaos Armour, Enchanted Shield, Sword of Anti-Heroes, Luckstone
- Chaos Sorcerer of Tzeentch
Magic Level 2 (Lore of Tzeentch), Chaos Armour, Chaos Familiar, Talisman of Protection
- Chaos Sorcerer
Magic Level 2 (Lore of Death), Chaos Armour, Channeling Staff, Chalice of Chaos
- 20 Chaos Warriors of Chaos Undivided
Halberd, Chaos Armour, Shield, Standard, Musician, Aspiring Champion
- 20 Chaos Warriors of Tzeentch
Halberd, Chaos Armour, Shield, Standard, Musician, Aspiring Champion
- 20 Chaos Warriors of Slaanesh
Halberd, Chaos Armour, Shield, Standard, Musician, Aspiring Champion
- 20 Chaos Warriors of Nurgle
Halberd, Chaos Armour, Shield, Standard, Musician, Aspiring Champion
- 20 Chaos Warriors of Khorne
Halberd, Chaos Armour, Shield, Standard, Musician, Aspiring Champion
- 22 Chaos Marauders of Slaanesh
- 5 Chaos Warhounds
- 5 Forsaken of Slaanesh
- 5 Forsaken of Slaanesh
- Chaos Chariot of Tzeentch
- Chaos Chariot of Tzeentch
- Chaos Chariot of Tzeentch
- 8 Chaos Knights of Khorne
Barding, Ensorcelled Weapons, Chaos Armour, Shield, Standard, Musician, Doom Knight
- 9 Chaos Knights of Tzeentch
Barding, Ensorcelled Weapons, Chaos Armour, Shield, Standard, Musician, Doom Knight
- 9 Chaos Ogres of Slaanesh
Great Weapon, Heavy Armour, Standard, Musician, Ogre Mutant
- 20 Chosen of Tzeentch
Halberd, Chaos Armour, Shield, Standard, Musician, Chosen Champion
- 5 Dragon Ogres
2nd Hand Weapon, Light Armour
- 5 Trolls
2nd Hand Weapon
- Chaos Spawn of Tzeentch
- Gorebeast Chariot of Nurgle
- Hellcannon
- Chaos Warshrine of Tzeentch
- Chaos Warshrine of Nurgle
Empire (and Ogres)
- Grand Master on Warhorse
General, Barding, Full Plate Armor, Giant Blade, Dragonhelm, Dawn Stone
- Wizard Lord of the Light Order
Magic Level 4 (Lore of Light)
- Wizard Lord of the Golden Order
Magic Level 4 (Lore of Metal)
- Arch Lector on War Altar
Horn of Sigismund, Shield, Armour of Destiny, The Mace of Helstrum
- Captain of the Empire on Warhorse
Barding, Full Plate Armor, Shield, Battle Standard, Talisman of Endurance, Sword of Might
- Master Engineer
- Warrior Priest
Great Weapon, Armour of Meteoric Iron
- Warrior Priest
Great Weapon, Armour of Silvered Steel
- Warrior Priest
Great Weapon, Glittering Scales
- Witch Hunter
Brace of Pistols, Light Armour
- Witch Hunter
Brace of Pistols, Light Armour
- Captain of the Empire on Warhorse
Barding, Great Weapon, Full Plate Armor
- Captain of the Empireon Warhorse
Barding, Full Plate Armor, Shield, Ogre Blade
- Battle Wizard of the Amber Order
Magic Level 2 (Lore of Beasts)
- Battle Wizard of the Amethyst Order on Warhorse
Magic Level 2 (Lore of Death)
- 40 Halberdiers
Halberd, Light Armour, Standard, Musician, Sergeant
- 40 Halberdiers
Halberd, Light Armour, Standard, Musician, Sergeant
- 25 Swordsmen
Light Armour, Shield, Standard, Musician, Duellist
- 40 Spearmen
Spear, Light Armour, Standard, Musician, Sergeant
- 10 Knights of the Inner Circle (Panthers)
Barding, Lance, Full Plate Armor, Shield, Standard, Musician, Preceptor
- 10 Knightly Orders (White Wolves)
Barding, Great Weapon, Full Plate Armor, Standard, Musician, Preceptor
- 10 Knightly Orders (White Wolves)
Barding, Great Weapon, Full Plate Armor, Standard, Musician, Preceptor
- 10 Knightly Orders (Venators)
Barding, Lance, Full Plate Armor, Shield, Standard, Musician, Preceptor
- 10 Knightly Orders (Venators)
Barding, Lance, Full Plate Armor, Shield, Standard, Musician, Preceptor
- 16 Crossbowmen
Crossbow, Standard, Musician
- 16 Crossbowmen
Crossbow, Standard, Musician
- 16 Handgunners
- 35 Greatswords
Great Weapon, Full Plate Armor, Standard, Musician, Count's Champion, Razor Standard
- 29 Flagellants
Flail, Prophet of Doom
- 6 Demigryph Knights
Barding, Lance, Shield, Standard, Musician, Preceptor
- 3 Demigryph Knights
Barding, Lance, Shield
- 8 Reiksguard Knights
Barding, Lance, Full Plate Armor, Shield, Standard, Musician
- 5 Outriders
Repeater Handgun, Light Armour, Musician, Outrider
- 5 Pistoliers
Brace of Pistols, Light Armour, Musician, Outrider with Repeater Pistol
- 5 Pistoliers
Brace of Pistols, Light Armour, Musician, Outrider with Repeater Pistol
- Great Cannon
- Great Cannon
- Helblaster Volley Gun
- Helblaster Volley Gun
- Celestial Hurricanum
- 6 Ironguts
Great Weapon, Heavy Armour, Standard
- 3 Ogres
Iron Fist, Light Armour
- 3 Mournfang Cavalry
Great Weapon, Heavy Armour, Standard
Anyway, that was the scenario. It didn't quite work out and I'd be changing things if we tried it again. Here is what happened, in pictures...
 |
| The Empire deployment in the town centre |
 |
| The Empire deployment on the west flank |
 |
| The Slaanesh temple, protected by Marauders and Warriors of Slaanesh, as well as a regiment of Warriors of Chaos Undivided and a Sorcerer Lord and his lesser sidekick. |
 |
| The Empire deployment closest to the temple comprised of the Inner Circle Knights led by the Templar Grand Master (the army general) and Captain, followed by Flagellants and Knights of the White Wolf. |
 |
| The Ogre Mournfangs deploy at the eastern entrance to the town centre. |
 |
| The trader himself: Samawan camped in the corner of the town centre furthest from the enemy advance. |
 |
| The town centre was a congested place, with units facing seemingly random directions. |
 |
| The south entrance to the town centre (and the point nearest the centre of the enemy lines) was filled by a large unit of Wolfygryphs. Those guys would dominate the battle. |
 |
| Another view of the central traffic jam. |
 |
| The Chaos deployment was difficult with the ruined buildings (the remains of city blocks) taking up valuable space. I had been meaning to leave that area more clean, but kind of forgot that during setup. |
 |
| The centre of the Chaos lines. That pale bloated fellow with the purple wings is the Daemon Prince leading the army. |
 |
| The Chaos view of the western flank. |
 |
| One of the Sorcerers emerging from the Slaanesh temple. |
 |
| The game commenced with the Wolfygryphs plowing into the Chaos Trolls, backed by the auras of a War Altar and Hurricanum. My Wizard with the Lore of Death cast a rather unnecessary Soulblight on the Trolls and did it irresistibly, blasting herself down to level 0 in the process. Very cunning. |
 |
| With +1 to hit and hatred, the Demigryphs were hitting on 2+ with rerolls. That pretty well qualifies as overkill. |
 |
| Predictably, bad things happened to the Trolls. Unfortunately this panicked the Warshrine off the table as the Wolfygryphs pursued, running down the Trolls and hitting (and breaking and running down) the Chosen. |
 |
| The Empire west flank was pretty static because I forgot I wouldn't be able to make decent use of Vanguard because the Chaos lines were only 12" away. Oh well. |
 |
| The Mournfangs head out on the town. |
 |
| The first turn was pretty quick, given many units just sat still and waited. |
 |
| The Tzeentch Chaos Lord charged the War Altar, but found it to be more resilient than expected. |
 |
| In fact, over 3 rounds of combat (the 2nd and 3rd with Speed of Light to help out), the Arch Lector had to take very few saves and failed only 1 of them. In return, he pounded his opponent with the Mace of Helstrum each turn. With a 3+ ward save (rerolling 1s) the Chaos Lord managed to pass his first save before failing the next 2. The second failure proved fatal... |
 |
| The second, smaller unit of Wolfygryphs had lined up a charge in the first turn, however they rolled abysmally and failed, blocking the Knights' charge from behind them as well. The foolish puppies were instead charged by a unit of Forsaken and a Chariot. They shrugged this off and won combat, which scared off the Forsaken but the Chariot held. |
 |
| The Undivided Warriors near the temple pulled off a goodly charge to engage the Inner Circle Knights, whilst their Slaaneshi comrades moved up in support |
 |
| Fortunately for the Empire, the Knights had received the blessing of Wyssan's Wildform in the previous magic phase, and were feeling sufficiently buff in preparation for the fight. |
 |
| The West flank during turn one. Note the blown up Cannon nearest the camera - serves me right for thinking I could shoot something with it, I guess. |
 |
| The monstrous Chaos forces of the east flank advance to either side of the Mournfangs. |
 |
| The Daemon Prince advanced down the street to the west of the town centre, offering moral support to his minions. |
 |
| The Spearmen contained my Light Wizard Lord, and Nick had a particular dislike for him for some reason. At every opportunity the Hellcannon was launching indirect fire at this regiment. That movement tray was full before the first shot... |
 |
| The Warriors find the buffed Knights a bit much to handle, however they do just enough damage to retain their steadfast and hold their position. |
 |
| The west flank after turn 1. |
 |
| The centre of the Chaos lines after turn 1. Note the absence of the Trolls, Warshrine and Chosen, all thanks to the Demigryphs and Nick's inability to roll leadership tests. |
 |
| In my second turn there were not a lot of charges, as most things were trapped or engaged. The Inner Circle Knights once again received Wyssan's Wildform, which was enough to cut down all but one of the Warriors, sending the survivor fleeing for his life. |
 |
| Unfortunately my pursuit roll was terrible, and the Knights were preparing to be charged once more. |
 |
| Meanwhile, the Mournfangs realised they could see some tasty, tasty Dragon Ogre around the corner of that building... |
 |
| Bad things happened to the Dragon Ogres as a result and they were run down, although they did take an Ogre with them. |
 |
| Nick started his turn with style. The Chaos Sorcerer used the Chalice of Chaos and rolled a 6. As Benji went off to find another Daemon Prince model, the rest of us looked up the rules and discovered the guy needed to pass a leadership test. This being Nick's speciality on the day, he failed. So Benji had to go look for a Spawn model instead. |
 |
| The second wave of Chaos units force their way down the street. The Daemon Prince and Chariot charged the Knights, who through good armour and resilient leadership held up the show for longer than expected. The Khorne Knights led by their Exalted Champion did bad things to the Demigryphs, though - their resistance was ended. |
 |
| The Knights had not been the Daemon Prince's first target, however. Here you can see his original chosen quarry making a tactical withdrawal. |
 |
| In my turn the Halberdiers realised they could see the Ogres, but failed the charge. The Ogres retaliated with a 12 on the charge dice, and the extra impact hits and a failed Fear test by the Halberdiers ensured the combat didn't go as I had hoped. |
 |
| The Halberdiers turned to flee, but were cut down unceremoniously. |
 |
| The Ogres pursued into the town centre. Despite me having piles of units facing every which way, somehow nobody was in a position to respond immediately. The best I could do was turn the Greatswords and Swordsmen around and invite (read: force) the Ogres to charge the Greatswords with an angle to give the Swordsmen a flank charge. However, the second part of my plan never happened. The Greatswords managed to narrowly out-fight the Ogres and ran them down as they fled. Bonus. |
 |
| On the western flank, the Chaos Chariot shrugged off a volley from the Outriders and charged them, making short work of them. |
 |
| The Chariot overran into the White Wolves, however it found they were made of sterner stuff and was broken and destroyed. |
 |
| Nick was not holding back with the magic phase, rolling 23 on the dice (we were using the Storm of Magic 4 vs 2 system for power and dispel). I retaliated the next turn by rolling a 6 in my phase. Boo yeah! Despite this, my magic was far more influential than Nick's during the game. |
 |
| This turn the Hellcannon missed the Spearmen but managed to hit and panic the nearby Handgunners. They rallied shortly thereafter. |
 |
| The Inner Circle Knights fought bravely, but perished. Actually, it was really just the Grand Master and Captain that fought bravely. The Knights failed a pile of armour saves and capitulated. Fortunately the characters held and fought on. |
 |
| In my third turn the Flagellants crashed through the Sorcerer-turned-spawn and overran into the Marauders who had strayed too close. |
 |
| Meanwhile the Slaaneshi Chaos Warriors cut down the Captain fighting them, leaving only the Grand Master. Even as the Captain fell, the 2 of them fought like demons and cut down 7 Warriors. This was enough to break the regiment, who failed to escape the vengeful Templar. |
 |
| On the other side of the town centre, the Knights continued to defy the Daemon Prince and Chariot, however the arrival of the second Chariot shortly afterward proved too much and they fell at last. |
 |
| Having dealt with the Dragon Ogres, the Mournfangs charged through a unit of Chaos Hounds and crashed into the Hellcannon. There their momentum ended, however. They found the daemon gave as good as it got. |
 |
| Buoyed by their success against the Chariot, the White Wolves continued forward down the street toward the Nurgle Chaos Warriors. |
 |
| Unfortunately they found they were really biting off more than they could chew... |
 |
| Near the temple, the Flagellants' excitement at their overrun was somewhat tempered by the Tzeentch Knights led by the Chaos BSB making a huge charge into their flank. |
 |
| What followed was a slightly messy combat. Before... |
 |
| And after. The Flagellants lost the combat, but in so doing they cut down a dozen Marauders and the Sorcerer Lord in their front rank. |
 |
| The glorious charge of the White Wolves. Away from the enemy. Hell, they didn't even outrun the foot-sloggers behind them... |
 |
| In turn 4 the Greatswords had fought off and run down the Chaos Ogres, and found themselves looking at the rear of the Chaos Knights fighting the Flagellants. |
 |
| Woohoo, chaaaaarge!! |
 |
| In the previous turn the Wolfygryphs had reformed to face the advancing Khorne Warriors, expecting to receive a charge. But the frenzied Warriors tripped on their angriness and failed the charge. Their failure to dictate terms of the engagement would prove painful. |
 |
| On the west flank the Nurgle Warriors were gloating. They would spend most of the rest of the game being blocked and shot at, but that didn't seem to bother them. |
 |
| The Halberdiers received the charge of one of the Chaos Chariots, but held firm and waited for help to arrive. |
 |
| With Speed of Light and both the War Altar and Hurricanum in range, the Wolfygryphs did a real number on the Khorne Warriors. And their Exalted, who never got to swing. Steadfast kept them in place, but their days were definitely numbered. And it was not a big number. |
 |
| The Halberdiers were rewarded for their patience as the Ogre Ironguts crashed into the side of the Chariot and did bad things to it. |
 |
| Who else wants some? |
 |
| The arrival of the Greatswords in the rear of the Chaos Knights and the White Wolves into the Marauders was not enough to break the Chaos forces. In fact, it wasn't even enough to win combat. I got smashed. Good thing both units were either stubborn or steadfast. It was nearly embarrassing... |
 |
| The Mournfangs, errr, Mournfang (singular) finds the Hellcannon a rather terrifying opponent and eventually succumbs to its tender affections. |
 |
| The Chaos forces continue to press along the road to the west of the town centre. |
 |
| Flee! The Ogres and Pistoliers both make their excuses and head for the hills when the Nurgle Warriors start throwing charge declarations around like candy. It was apparently too much to hope that they would fail a redirect test. |
 |
| "It's called a tactical withdrawal, lads!" |
 |
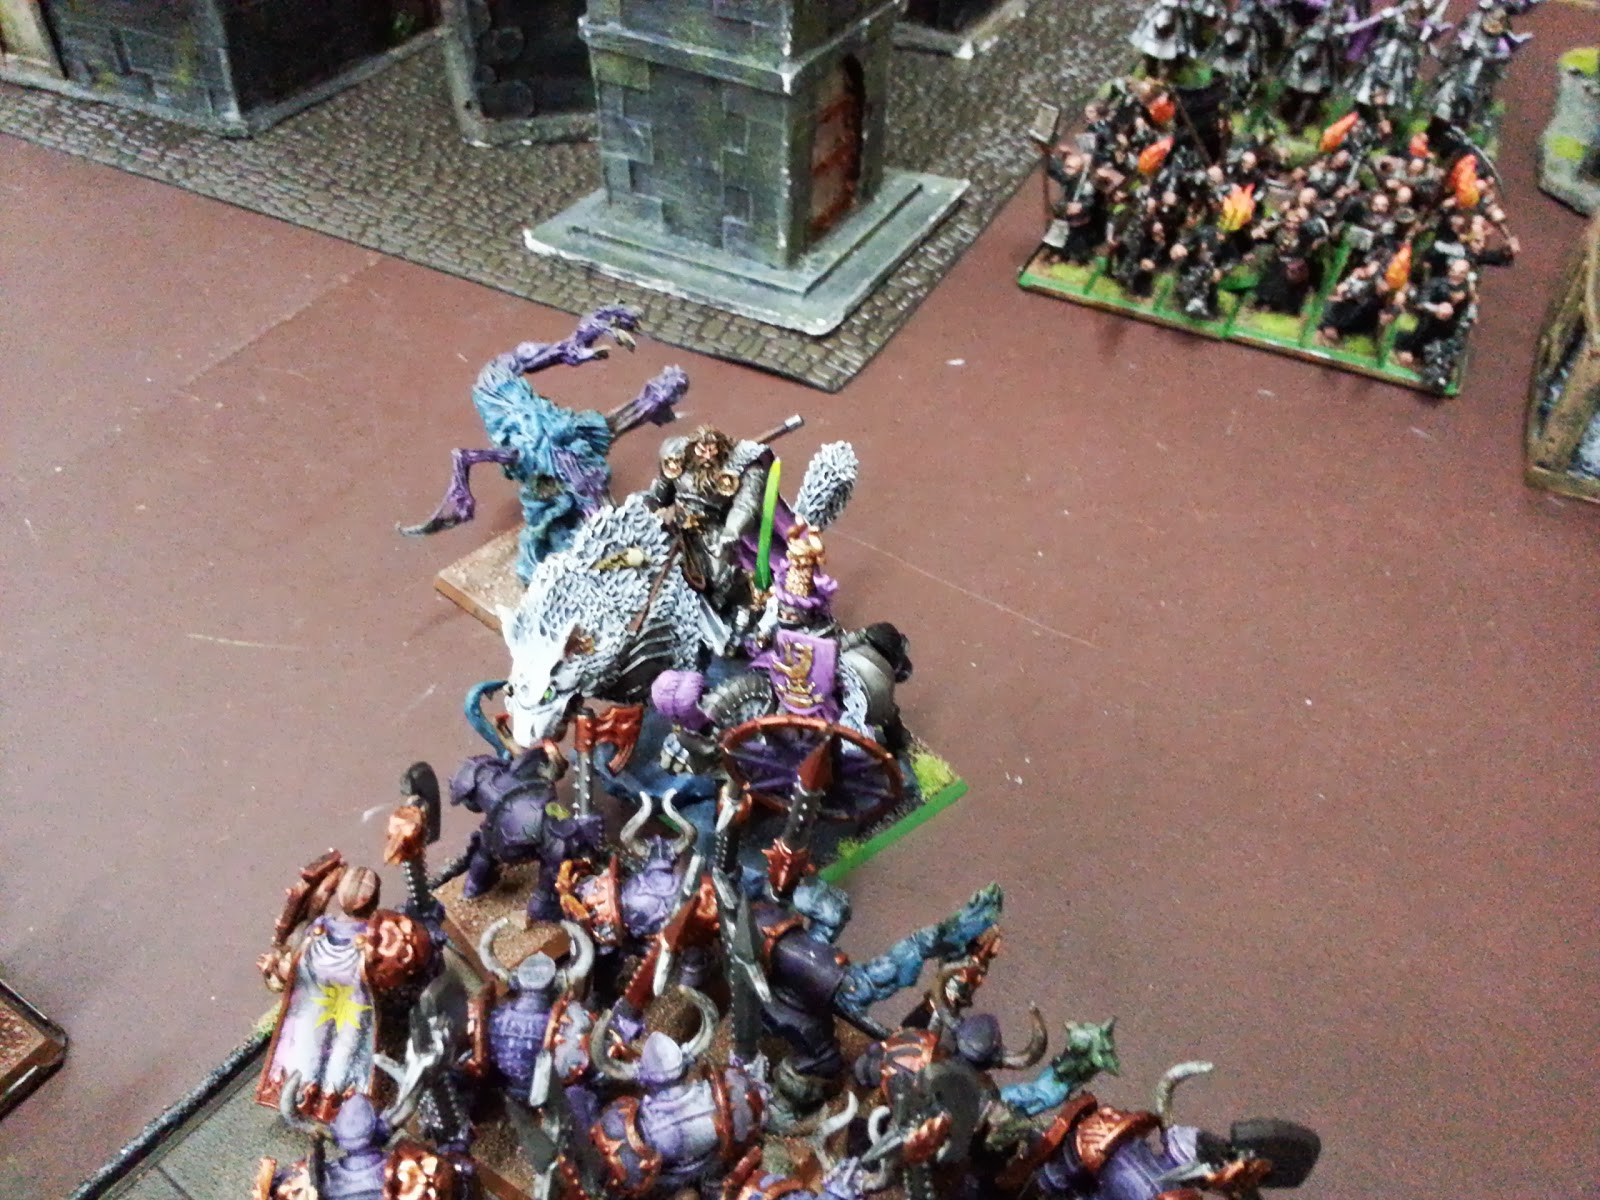
| And now the moment of truth: the Daemon Prince decides things are not going quickly enough and figures he will speed things up by landing smack bang in the centre of the town square. Admirable. Heroic. Ill-advised... |
 |
| Is that really 2 Volley Guns within short range? Ah well, only 1 of them has an Engineer, right? It's all good... |
 |
| The Halberdiers get a sensation of deja vu as another Chariot crashes into them alone. Once again they lost but held their ground. Those Khorne Knights did want to charge, but the Daemon Prince had been in their way before he flew off on his questionable mission. |
 |
| The few remaining Khorne Warriors flee as the Wolfygryphs reform to fit through the narrow point of the street. |
 |
| We shouldn't be worried about those Ogres, right? Nah, relax. They're well out of range... |
 |
| In turn 5 the Grand Master charged the remains of the Marauder unit (who had outlasted the Flagellants and chased off the White Wolf Knights (not a great game for the White Wolves, to be honest. Didn't cover themselves in glory)... |
 |
| ...and overran into the rear of the Chaos Knights. Finally the Greatswords started to win the combat. Over 2 rounds the Grand Master cut down the BSB in a challenge and the Knights fled and were run down. |
 |
| The heroics of the Daemon Prince were short-lived. Finding himself surrounded by a War Altar, Wizard Lord, 2 Volley Guns and a Cannon, he didn't even make it through the magic phase. A double dose of Banishment was more than he could take. Alas, poor ugly! |
 |
| The Ogres dealt summarily with the Chariot, but then had to turn and face the music. The frenzied, angry, very very choppy music. It didn't go well. |
 |
| But they held! Because double 1s are easy and Warhammer is a cruel mistress. Just ask Nick. It was insult to injury. |
 |
| The Pistoliers had come back to block the Warriors once more, but again they refused to fail a redirect roll and crunched into the Crossbowmen. That went about as well as could be expected for the Crossbowmen. |
 |
| Having already killed half of Nick's army, the Wolfygryphs charged the Tzeentch Warriors and beat them handily. Of course, they were steadfast. Naturally they failed anyway. Hey, at least they outran the doggies... |
 |
| And this is where we left things at the end of turn 5. Tzeentch Warriors rallied, but did so right in front of the Khorne ones, who ran right through them and panicked them again. Well planned, that. It seemed a good way to end what had been a bit of a debacle of a game. |
Final result: Not a victory for the Chaos Warriors.
So in the end it was a rather lop-sided game. What could have been done differently to fix the problem and make the plan work? One suggestion that I would definitely embrace next time was to move the town centre 12" back, giving the Chaos player a 24" deployment zone instead of 12". The area behind the town centre was basically dead space anyway, stretching our terrain resources unnecessarily for no real benefit. I had automatically put the town centre in the middle of the field, but it would have worked better set back a foot. I would also stick with my initial plan of having the city blocks in the Chaos zone more or less destroyed as a result of their assault. It helps reflect the devastation caused in the wake of their advance, and gives the player more room to set things up rather than having his forces stuck in isolated avenues of attack. The Chaos player is meant to be the aggressor - not left with units stranded like sitting ducks, waiting for the Demigryph charge to wipe them out.
Another important improvement would be to keep a lid on the army sizes. 8000 points made for too much congestion and meant there was simply too much stuff for the Chaos player to force his way past to get to the trader. 5000 points would still have been a good sized game, and would have gone some way to alleviating the problem. I also need to assess whether the Chaos player should actually have more points to work with than the Empire player, who has the advantage of defending a position with limited avenues of advance. I had thought the superior quality of the average Chaos Warrior would help them win through, but it didn't really end up that way when the Empire had access to units like Demigryphs. It would also help for the Chaos army to have more fancy toys at its disposal, like Skullcrushers and Shaggoths. I am still wary of too many flying units bypassing the street layout though, so wouldn't allow more than a single Chimera to be added.
I think the Slaanesh temple needed to be closer to the town centre. As it was, Nick never even tried to teleport units across with the bound spell. He didn't consider there to be any real benefit to offset the risk of rolling irresistible force and blowing the place up. I think it needs to be closer to make use of this ability more tempting, rather than just sending everyone slogging forward from the regular deployment zone.
Anyway, for a failed report this ended up taking a long time to put together, so we'll leave it there. If we decide to revisit the scenario, hopefully I'll have something more entertaining to report. Till next time!


Mate, that's how Warhammer is meant to be played. Big, cinematic and narrative. Thanks for that, it was excellent reading. Telling it with pictures helped a lot too, adding atmosphere and making it much easier to grasp.
ReplyDeleteYour other mistake was failing to wait the week or so required for me to a: create a whole empire city from scratch or b: paint up all the shiny toys in the Chaos list. After buying them obviously.
ReplyDeleteTwas good to see the Palace of Forbidden Pleasures used in a report! And the sparesness of the city gives me a good excuse to build more Empire buildings. I am also glad to see the Bile Toad Appreciation Society lasted much longer than they do when I lead them.
Great report! I'll have to start building some more buildings now, to try to recreate that battle.
ReplyDelete