

A 5000pt 8th Edition Warhammer Fantasy Battle report
Time for another game of Warhammer Fantasy. A traditional Orcs vs Dwarfs bash, with a couple of special characters and an objective in the middle to fight over. Whoever is closest at the end wins. Simple enough, right? I took photos, so I'll present the game as a bare bones battle report, with no maps or anything exciting like that. Just pictures and captions. At least that way it actually gets done...
Thorgrim scowled down from his throne at the ranger before him. Feeling the weight of the High King's displeasure, the ranger was doing his best to use his skills of stealth and concealment to sink into the stone of the throneroom floor and disappear.
"What do you mean, 'misplaced'?" growled Thorgrim. He glanced at the Great Book of Grudges that sat open before him, and his fingers twitched involuntarily toward his pen.
The ranger saw this, and blanched. "We were ambushed by Orcs on our way through the valley, My Lord. We were able to drive them off and guard the caravan, but it seems one of the grudge ponies must have left the path in the confusion..."
The knuckles of the King's other hand whitened as they tightened their grip on his empty tankard. "So you defeated the Orcs, and the one thing you managed to lose track of was my personal shipment of Bugman's XXXXXX?"
The ranger nodded slowly, barely daring to breathe.
"Tell me," Thorgrim spoke slowly, with exaggerated patience, "when you realised my beer was missing, why did you not go back and find it?"
"We did go back, My Lord. But the area is now swarming with greenskins. They probably have the pony by now."
Thorgrim growled and slammed his empty beer mug down on the army of his throne, snatching up the pen with his other hand. He then paused a moment, calming his breathing. The ranger cringed as the King glared at him from beneath his bristling eyebrows.
When Thorgrim eventually spoke, it was with the same exaggerated calm. "I understand, ranger. I'm sure you did your best. I have only one more question for you. How do I spell your name?"
*****
The Goblins rummaged around in the small wagon behind the pony, and eventually one of them produced a small beer barrel, emblazoned with the markings XXXXXX.
"Yesssss," hissed the voice in Azhag's head. He could feel the satisfaction emanating from the crown on his brow. "This is the one. The Dwarf King will leave the safety of his stronghold to retrieve this wagon."
Azhag's maniacal laughter echoed that of the crown, and as usual his ladz did their best to ignore it and get on with the important business of tormenting the pony.
The Armies
Dwarfs
My army was really based around my desire to use Thorgrim Grudgebearer again. He's a cool model and had only ever seen use once before. The size of the game had a lot to do with his presence, too. A 650 point, largely unkillable lord kind of demands a larger game in order to maintain some sort of balance. I decided to go relatively light on the artillery, instead making sure it would be relatively reliable with the help of some runes. I also knew Tim would have multiple hordes, so I ensured I would have a couple to face off against them. In the end it was a fairly "elite" army, with no regular Warriors. I really need to get some more normal Dwarfs painted to give me more options in that regard.- Thorgrim Grudgebearer
- Daemon Slayer with Runic Weapon with Master Rune of Swiftness, Rune of Fury
- Runelord with Runic Talisman with Rune of Spellbreaking, Gromril Armour with Rune of Stone, Great Weapon
- Thane with Battle Standard, Gromril Armour with 2 Runes of Iron, Rune of Stone, Great Weapon
- Thane Helga with Gromril Armour with Rune of Stone, Runic Weapon with 2 Runes of Cleaving
- Josef Bugman
- 20 Quarrellers with Full Command, Great Weapons, Shields
- 20 Thunderers with Full Command, Shields
- 40 Longbeards with Full Command, Great Weapons, Shields
- 30 Slayers with Standard, Musician, 1 Giant Slayer
- 34 Ironbreakers with Full Command
- 19 Hammerers with Full Command, Shields
- Gyrocopter with Steam Gun
- Gyrocopter with Steam Gun
- 16 Irondrakes with Full Command, Strollaz's Rune
- 17 Bugman's Rangers with Full Command
- Cannon with Rune of Forging
- Organ Gun with Rune of Accuracy, Rune of Forging
Orcs and Goblins
Tim's army was built around Azhag the Slaughterer, who I had agreed to paint up in the week before the game. It gave him a centrepiece to offset Thorgrim. He then showed admirable restraint in fielding no other Wyverns and only 1 Arachnarok. I think he sort of ran out of points after building out his army with multiple large blocks. He ensured he had a few war machines. Again, my Orcs and Goblins need a bit of painting attention in order to offer more options around things like this. My Goblin Spear Chukkas are battered about, and I don't have anything more than what he chose in ready-to-use condition. I think I have a few projects to work on.- Azhag the Slaughterer
- Orc Big Boss in Boar Chariot with Battle Standard, Armour of Destiny
- Savage Orc Shaman (Level 2) with Lucky Shrunken Head
- Night Goblin Big Boss with Basha's Axe of Stunty Bashin', Short Bow; Light Armour; Shield
- Night Goblin Big Boss with Seeds of Rebirth, Short Bow; Light Armour; Shield
- Savage Orc Big Boss on Boar with Dragonhelm, Great Weapon
- Black Orc Big Boss with Heavy Armour, Shield
- Black Orc Big Boss with Heavy Armour, Shield
- 98 Night Goblins with Spears, Full Command, 3 Fanatics
- 31 Savage Orc Big 'Uns with Full Command
- 39 Orc Boyz with Full Command, 2 Choppas
- 39 Orc Boyz with Full Command, Shields
- 10 Goblin Wolf Riders with Musician, Spears, Short Bows, Shields, Light Armour
- 10 Goblin Wolf Riders with Musician, Spears, Short Bows, Shields, Light Armour
- 40 Black Orcs with Full Command, Shields
- 9 Savage Boar Boyz with Full Command, Spears, Shields
- Orc Boar Chariot
- Orc Boar Chariot
- Arachnarok Spider
- Mangler Squig
- Mangler Squig
- Rock Lobber
- Rock Lobber
- Doom Diver
- 4 Stone Trolls
- Giant
Deployment
 |
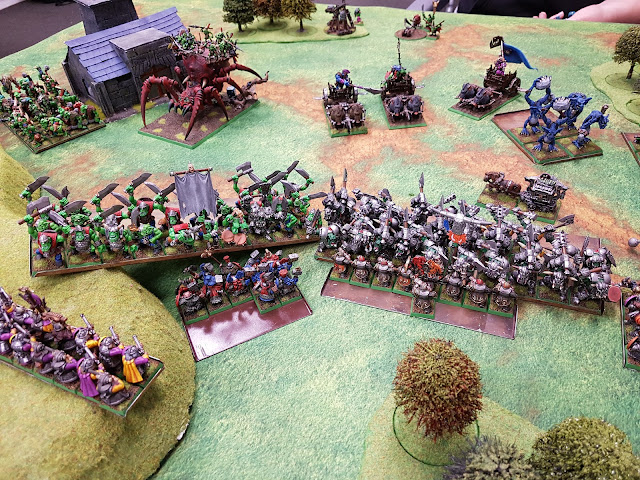
| The armies line up. Note the Grudge Pony in the centre of the table. That was the sole objective of the game. Kills didn't matter. |
 |
| Tim had a lot more deployments than me, but started by just lining up his stuff as it was coming out of the box, and soon found himself with awkward decisions around things like his Mangler Squigs, who had no room near the centre. |
 |
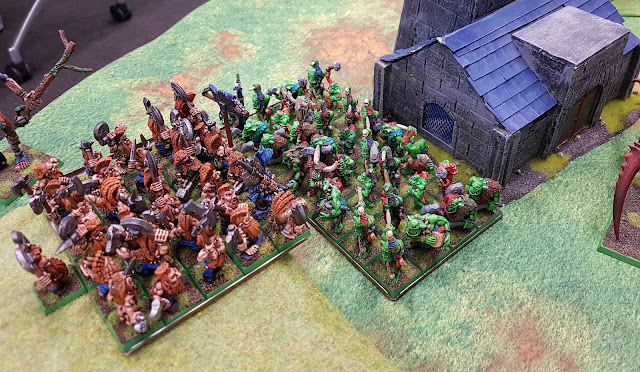
| The Savage Orcs went behind the building with the clear intention of walking into and through it. The Wolf Riders on the flank used Vanguard to get a bit closer to my lines. |
 |
| The other flank was sort of dominated by the regiment of 100 Night Goblins. The Mangler Squigs both ended up over here simply because there was room on the front line there. The Wolf Riders didn't end up using Vanguard, because Bugman and his Rangers had Scouted forward in their path, blocking their advance. |
 |
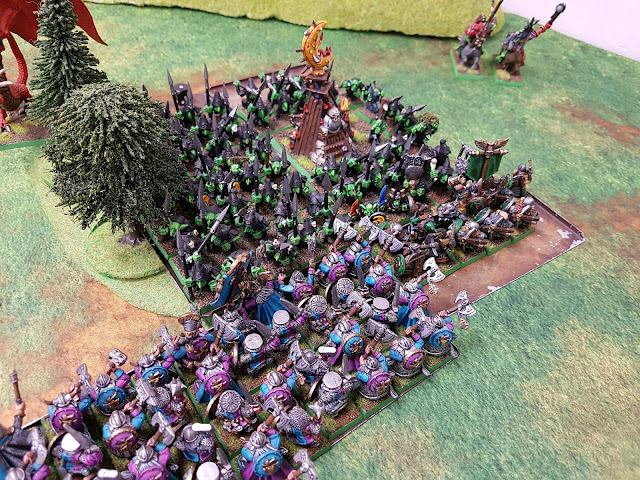
| On my left flank, I had the bulk of my shooting troops on the hill with a good view of the approach to the objective. Might as well put them somewhere relevant. The Slayers took the flank. |
 |
| Right in the centre nearest the objective, the Irondrakes used Strollaz's rune to Vanguard closer to the enemy. Again, they were where they could bring their fire to bear on enemies moving for the centre. I normally give this unit the rune to compensate for their shorter range. The Organ Gun's deployment was not ideal, in the forest. A relevant location in the centre, but their lines of sight got pretty messed up. |
 |
| Thorgrim led the Ironbreakers near the centre. Seemed like a combination that made sense. They're hard to kill, and he makes them Immune to Psychology and Stubborn... |
 |
| Azhag the Slaughterer, who finally got painted for the game. The Wyvern has been painted for years, but Azhag himself has taken a while to catch up. |
Dwarfs Turn 1
 |
| I won the roll-off for first turn, and proceeded to advance with much of my stuff. The Slayers didn't go too quickly to ensure my Quarrellers had a line of sight to the Wolf Riders. They repaid me by killing half the unit (they may have had some help from a few of the nearby Thunderers), and the remaining Goblins promptly panicked and fled the field. Very efficient. |
 |
| Things went even better on the right flank. My Cannon lined up one of the Mangler Squigs, and the shot not only killed the beast, but bounced on and destroyed the Rock Lobber too! To add insult to injury for Tim, this then panicked the second unit of Wolf Riders and they also turned and ran from the field. He'd lost both units without getting a turn. One of the perils of playing a large game with Orcs and Goblins is that you can only spread the influence of your General and BSB so far to shore up the army's questionable leadership. I think I will make a point of making up and painting some Wolf Rider characters to help with this next time. |
 |
| As I said, most of my line advanced. The Hammerers did their best to wheel around in the gap left by the Vanguard of the Irondrakes. I clean forgot that Organ Guns have a range of 30" in the 8th ed Dwarf book, so didn't fire in Turn 1. Oh well, so I'm a little rusty on these things... |
 |
| The Gyrocopter was lurking with intent near the Rangers, who failed to hurt the second Mangler Squig with their shots. The Gyrocopter was likely to be useful with all the Fanatics and the Mangler in the area. |
Orcs and Goblins Turn 1
Tim had copped a pretty effective opening salvo from my forces, thanks largely to the Cannon shot. Now it was his turn to try to return the favour... |
| What's 100 Night Goblins without a few Fanatics? Of course, the location of the forest made it hard for Tim to do much about my most advanced forces. The Fanatics did their best, but none of them made it to my units. The Mangler was also underwhelming with a 7" move. The Doom Diver took a shot at the Gyrocopter and hit it, but left it alive with a single wound. Tim had actually cast Spirit Leech against it (I allowed it), but failed to beat my leadership in the roll-off. |
 |
| The main Orc line advanced, as you would expect. |
 |
| The Savage Orcs entered the building as expected, whilst the Giant advanced cautiously. Seemed he didn't want to be charged by a large number of Slayers. After Azhag had cast Spirit Leech, the Savage Orc Shaman threw 6 dice at boosted Foot of Gork. I rather rashly decided to use my 6 dispel dice to stop it rather than using my Rune of Spellbreaking. My folly was rewarded when I exactly equaled Tim's roll of 25... All skill, I assure you. |
 |
| Fanatics in my path, but then with my little stumpy legs, I wasn't really in a position to charge yet. I could wait for the conditions to improve... |
 |
| The Daemon Slayer and Giant eye each other with interest. |
Dwarfs Turn 2
 |
| With his machine badly damaged, the Gyrocopter steered it toward the remaining Mangler Squig and crashed into it, killing both of them in a cloud of debris. This was inevitable when Tim had left the thing on 1 wound, but then I rather foolishly dropped a bomb on the Night Goblins as I flew overhead, just because I could. It was an idiotic thing to do when I could have rolled a misfire. I didn't - I killed half a dozen Night Goblins. That was lucky! |
 |
| With the other Mangler gone, my right flank was starting to look more or less under control... |
 |
| The Irondrakes held their position and did their best to whittle down the advancing enemy, who were getting a little close for comfort now. The Hammerers found their gap in order to reach the front line, which was good. My Cannon fired again, this time taking a few wounds from the Arachnarok. I remembered to fire with the Organ Gun this time, but everything had cover so it didn't achieve much. |
 |
| The Slayers formed ranks around the Daemon Slayer and shifted up a bit more. I figured they'd get a go at something next turn, especially if the Savage Orcs left the building. |
 |
| OK, so the Daemon Slayer was basically hiding in the unit. I didn't like the idea off him facing off against the Giant alone, with the prospect of a Thunderstomp to practically guarantee his fate. I had at this point forgotten that Daemon Slayers do D3 wounds - he really was a pretty fearsome enemy for the Giant, especially after my Quarrellers wounded the big guy twice that turn. |
Orcs and Goblins Turn 2
 |
| In Tim's turn, the Savage Orcs failed their frenzy test and made straight for Bugman and his Rangers. They had shot one of the Orcs the previous turn, but now they stood and shot with throwing axes and felled 5 more! The Night Goblins joined in the fun, which at least meant the remaining Savage Orcs were not murdered by their own Fanatic - the Night Goblins took one for the team there. What's a few dead Goblins when you have almost a hundred more? |
 |
| My right flank was not the only place to see action. The Irondrakes stood and shot as the horde of Black Orcs bore down on them, but it was never going to do much good. There were far too many of them and they're Immune to Psychology anyway. The Orcs needed to roll an 8 to make it to the Hammerers (one more than the Black Orcs) and they also delivered (both units rolled exactly what was required in a great display of nail-biting efficiency from Tim). Things were looking grim a bit earlier than I had anticipated. |
 |
| Tim had this worked out. If the Black Orcs broke the Irondrakes, they would hit the flank of the Hammerers. That might be enough to get rid of them too, freeing up the other Orcs to carry on into the Quarrellers. Oh well, who needs a centre anyway, right? |
 |
| The Savage Orcs failed their frenzy test and scrambled out off the building, facing the Slayers. Hey, it's probably what they would have done anyway. The Giant declined to charge the Slayers alone, moving around to their flank in anticipation of a combined effort with the Savage Orcs next turn. |
 |
| If he could clear off the Slayers, Tim would have my left flank completely vulnerable. My missile troops can fight a bit, but all my main regiments were on the other side of the centre. |
 |
| How things stood before combat. Azhag had cast Fate of Bjuna on my BSB with irresistible force, but had failed to beat his Toughness with the roll. The resulting backlash from the power of the spell wounded both Azhag himself, and the Savage Orc Shaman on the other side of the field. |
 |
| The useless lines of sight I had left my Organ Gun with. |
 |
| Well at least the Chariots would have to wait their turn. |
 |
| OK, so the combat on my right didn't really go the way either of us expected. The Savage Orcs only killed a few Rangers, and although the Night Goblin Big Boss had a deadly anti-Dwarf weapon, it was no match for Tim's ability to roll 1s to wound, and so he only killed a couple as well. It added up, but... not to a large enough number to cancel the toll the Rangers took on the Night Goblins. The Big Boss was wounded, and maybe 10 of his little mates were cut down by the hatred-fuelled Dwarfs. I ended up winning combat by 1. This was too much for the Boar Boyz, who decided they had made a mistake fled for the hills. Given they were below 25% strength, they didn't rally. |
 |
| So, this combat.... I'm doomed, right? Tim elected to use additional choppas, which meant he had 29 Strength 5 attacks in the first round. I would get 6+ armour and 6+ ward saves to fend this off. That's not enough, right? Right? |
 |
| Well, let's be clear. It should not have been enough. But then, Tim didn't roll as much damage as he might have, and I passed quite a few saves. My Irondrakes also inflicted 5 or 6 wounds back on the Black Orcs. In the end I lost combat by 5. I failed the break test, but my BSB was in range, and on the re-roll I got the 5 I needed. My unit held, shielding the flank of the Hammerers. Tim was most unimpressed. For their part, the Hammerers were always likely to hold thanks to Stubborn, they actually pummelled a fair few Orcs, too. And now both Orc units were without their Choppa strength bonus in the next round of combat... |
Dwarfs Turn 3
 |
| I couldn't just leave my Rangers to try to hack their way through 100 Night Goblins, so I sent my Longbeards in to assist. I might not normally have done this, given the possibility of getting bogged for multiple turns against a Steadfast regiment. But in this case, the Night Goblins were sitting squarely in a forest that cancelled their Steadfast. Now was my chance to hit them hard and clear them out of the way. |
 |
| Thorgrim's Ironbreakers also charged. Tim really considered fleeing from this charge with the Orcs, but came to the conclusion that the possibilities for counter-charges were too tempting and it was worth risking the lives of 40 of his finest greenskins. The Orcs themselves were not consulted, but no doubt they would have approved anyway. The Ironbreakers copped a hiding on the way into combat, losing 8 of their number to the Fanatic in their path. Oh well, that was out of the way now too. |
 |
| The Thunderers were in the front arc of the Orcs, so couldn't really move to help the Hammerers. The Quarrellers did their best instead, brandishing their great weapons as they hit the Orcs in the flank. |
 |
| The Slayers could no longer see the Giant, so had to content themselves with charging the Savage Orcs. They could "handle" the Giant later. |
 |
| The Gyrocopter was given strict instructions to make himself useful, and sighed tragically as he flew off and landed directly in the path of the Arachnarok. Poor guy. It's a terrible job, being an expendable unit. His hopes might have lifted slightly when the Cannon shot again at the Arachnarok, but I left it alive on a single wound. |
 |
| I would have liked to send help for the Irondrakes, I really would have. Unfortunately it was simply impossible. The flank of the Black Orcs had been a fraction of an inch outside the arc of the Ironbreakers, and nothing else was available in the area. It was sad, given their heroic holding of the line the previous turn. Of course, I didn't realise what they were going to pull this turn... The Black Orcs were now fighting at Strength 4 instead of 5, and so only managed to kill 4 more Irondrakes. For my part, my unit had dropped from 16 models to 9, and they no longer had hatred. Imagine my amazement then when they did more damage than they had the previous turn, and actually managed to win combat! It was utterly heroic! Unfortunately the Black Orcs were never likely to flee with the BSB nearby, and my brave little Irondrakes were still without any hope of rescue... |
 |
| Thorgrim and his Ironberakers utterly went to town on the Orcs. Tim didn't bother removing all the models for this photo. By the time the Orcs fled, more than half of them were dead. I think I killed 25 or something. Bits of Orc were flying everywhere. And I lost all of 4 Ironbreakers in return. It was understandable when the Orcs fled as quickly as they could, and somehow entirely predictable when the unstoppable Ironbreakers ran them down with ease. Contempt, even. By the time we finished moving my unit, it was well out of the arc of the Trolls and Azhag. |
 |
| The rescue of the Hammerers didn't go quite to plan. The casualties were racking up on either side, but I didn't gain enough of an advantage to break the Orcs. |
 |
| The fight between the Slayers and Savage Orcs was brutal. In the end the Slayers won by 3, and it was enough to send the Orcs packing. They fled a very impressive 12", leaving the pursuing Slayers languishing on the other side of the building. Amusingly, only one Savage Orc failed his dangerous terrain test for fleeing through the building - the Shaman, who had already been wounded by Azhag's reckless miscast the previous turn. Clearly he was dazed from that when he turned and fled face-first into the wall, which finished him off. |
 |
| Not sure I was doing a good job of controlling the field... |
 |
| The Ironbreakers might have forced their way clear of danger, but the Longbeards had been left far behind. Their pursuit would have been enough to take them into Azhag, but at that time the Ironbreakers had been in the way. Now they were stranded behind the rest of the line... |
Ahh ... Dwarves vs Greenskins, rank n' flank. I do love a classic.
ReplyDeleteVery retro - I love it!
ReplyDeleteGreat to see you blogging again. Especially with such an epic battle!
ReplyDeleteGlad to see another epic hoodling battle. I hope even if you aren't blogging as much that you are still enjoying your hobby.
ReplyDeleteYes, this game is a bit of a retro classic match off. In some ways it's a bit of a warm-up. We're talking about trying to get organised enough to play out the Battle at the East Gate from the 4th ed Dwarf book. Adapted for the times, of course.
ReplyDeleteAnd I feel like I am gradually finding my groove again a bit in terms of my hobby. We'll see how things look when this latest transition period settles.
I'm glad to read this, Hood.
ReplyDeleteI'm glad to have you reading it. :)
DeleteGreat to see you back Hoodling! I am not sure about 8th edition rules for cannonballs anymore, but aren't bouncing balls supposed to stop when they hit a hill?
ReplyDelete