This is part 2 of my report of a recent tournament. You can find the previous part here.
Game 2 - Dawn Attack
Harry Pearse - Dwarfs
- Lord on Shieldbearers with Gromril Armour, Great Weapon*, Shield, 2 Runes of Striking, Rune of Might, Rune of Iron, Rune of Preservation, Rune of Stone
- Runesmith with Gromril Armour, Shield, 2 Runes of Spellbreaking
- Thane with Battle Standard, Gromril Armour, Shield, Master Rune of Grugni
- Thane with Gromril Armour, Shield, Dwarf Pistol, Rune of Stone
- 50 Dwarf Warriors with Heavy Armour, Shields, Full Command
- 10 Thunderers
- Cannon
- Grudge Thrower with Rune of Accuracy, Rune of Penetrating
- Gyrocopter with Brimstone Gun
- 35 Hammerers with Heavy Armour, Shields, Great Weapons, Full Command
- 10 Miners with Heavy Armour, Great Weapons, Champion
- Organ Gun with Rune of Accuracy
*When I first read through Harry's list, I assumed he'd decided that Strength 4 on his Lord was enough, provided that it would double against Toughness 5 or more. It turns out he'd missed the rule saying the great weapon counts as a hand weapon anyway because of the runes. In Harry's defence, it took several of us waaay too long to find the rule in the book that we all knew was there somewhere. I had actually given up and decided they must have dropped the rule in the latest book when someone finally spotted it right where we had all been looking.
Honestly, against my list the great weapon probably didn't matter much anyway. The Lord was sitting happily in a unit of 35 Hammerers, along with every other character in the army. I guess it's what you would call a "traditionalist" Dwarf approach. Take every egg you can find, and stuff it in the Hammerer basket. Not the way I do things, but I'm a weirdo and not really a proper Dwarf player. When we went to KFC immediately before, Harry put his name is as Grombrindal up on the screen. I should really just defer to his superior Dwarf cred...
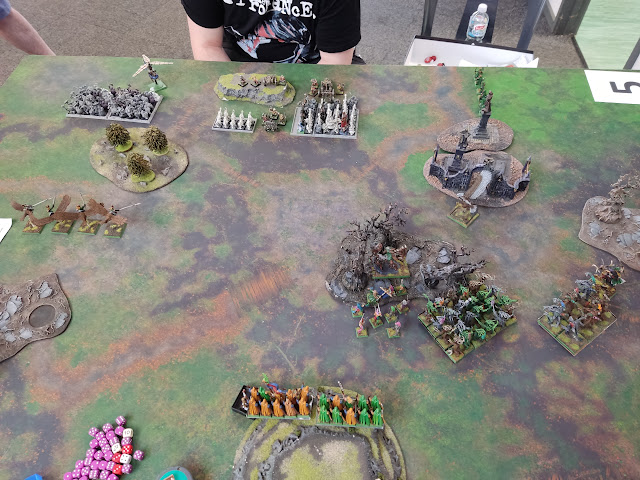
The scenario was Dawn Attack, which means you do have to nominate units for your characters before rolling to see where they all end up. I've been cruelled by this a couple of times, but this time the dice were merciful and my deployment more or less made sense.
The fat Warrior unit landed on the flank along with the Gyrocopter, but everything else was right in the middle.
My Warhawks went on my left, the Treekin on my right, and everyone else in the centre.
The exception of course was the Waywatchers, who cheekily appeared in Harry's deployment zone, intent on picking on the war machines.
I got the first turn (which I appreciated with all the enemy artillery) and advanced. We tried to make use of what cover there was over on the approach.
I made the mistake of leaving the Spellweaver back with the Glade Guard. In later games I decided it was better for her to run with the Wardancers - I left her largely out of range in the first turn, which was silly.
With plenty of power dice and few targets, the Spellweaver focused on Hand of Glory on her unit, and they promptly removed the Organ Gun with a hail of incredibly accurate arrows. It was a simple plan, but that thing concerned me.
Rather surprisingly, the Hammerers decided they felt lucky and had a crack at a huge charge on the Eagle. Shocking nobody, they didn't make it and shuffled around a bit, whistling and acting casual.
On the other flank, Harry wanted to be doing things to my Warhawks with the Gyrocopter, but his own Warriors were interfering and it ended up floating around at the back. Most of Harry's shooting was pretty ineffective that turn. The Thunderers managed a wound on the Warhawks through the trees, and I might have lost a couple of Wardancers to a Grudge Thrower shot.
The Warhawks braved another volley from the Thunderers in order to charge them, taking no further damage. Fewer Thunderers died on the charge than I expected; in truth, fewer died than should have died. I somehow assumed that the Thunderers would have shields, and so was giving them parries and save bonuses. I confused Harry, and he just went along with what I was telling him. We figured it out later. Anyway, it probably didn't matter much. We killed maybe 3 on the charge. Perhaps it should have been 4. Still not enough to do the job or negate their Steadfast.
My units were being relatively cautious about the Hammerers at this point. The Eagle had tried and failed to charge the Grudge Thrower, so Harry was surely going to try his luck again. I didn't want to give him a redirect target. The Treeman was the only one who could really advance and stay out of their arc.
Sure enough, the Hammerers really didn't like the Eagle and had another go at it. This time it fled and escaped, though it didn't flee very far. Further probably would have been better... I didn't take a photo, but the Warhawks actually fled from the Thunderers this turn. Fled from about 6 Dwarfs with no standard or ranks. Again, it was unexpected. Pretty disappointing too. At least we got away, I suppose. I believe it was at about this point that a cannon ball did 6 wounds to my Lord, making short work of him. That was also disappointing.
In my third turn I continued to look at the Hammerers and do nothing much to them. I moved around them where I could, but I couldn't do anything other than poke at them with Strangleroots. My Waywatchers were still firing at the Grudge Thrower; I think they finished it off this turn, or maybe it was the next. They were making hard work of it, despite firing 12 shots a turn.
The Warhawks rallied, as did the Eagles. The Glade Guard tried to cover for the embarrassment of the Warhawk riders by wiping out the Thunderers with arrows, but the shame was still there.
Right, so see those Warriors? They're 10" away from my Warhawks. They decided to charge, and I figured I was not OK with him reaching them with a 7 on the dice, so I fled...
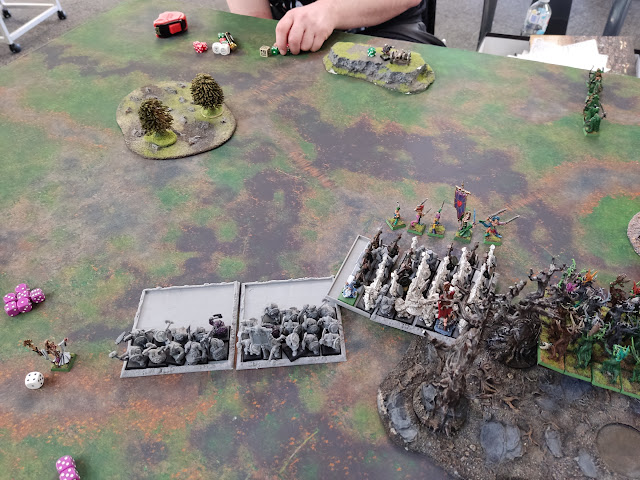
...But they caught me anyway. Somehow we fled 3", the Warriors charged 15" (like seriously, what sort of Dwarfs were they?) and my unit was destroyed. More embarrassment. This photo appears to be from my next turn, actually. I was probably too shocked to take any photos, and too busy removing bits of roadkill Warhawk from the playing surface. You'll note the Treeman is also gone here - the Cannon killed him in one shot too. It was all most excellent. I'll be honest - at this point without the prospect of either my Lord or the Treeman in the flank, I probably had no realistic prospect for engaging either of the Dwarf regiments in combat. My hopes all lay in withering archer fire and maybe casting Fiery Convocation or some boosted Soul Quenches on a unit to get it down to a manageable size before charging. Unfortunately I'm quite good at dice and never managed to cast Fiery Convocation. So that plan wasn't going well either.
The Wardancers were making a point of staying out of charge arcs, whilst pretending to be interested in fighting someone. The BSB had already fired off her Hail of Doom Arrow at the Cannon before it killed the Treeman, but that obviously didn't go so well.
Harry decided to let his shooting deal with the units behind his main units, and turned and headed toward my lines with them instead. Some of the Wardancers died, further decreasing the likelihood that they would ever see combat.
Operation Shoot All the Warriors was in full swing at this point, with my Glade Guard (generally boosted by Hand of Glory) unloading into them repeatedly. I didn't bother with the Hammerers because they were working with cover. This was probably a mistake, in hindsight. I had 2 units sitting there that might have been able to engage them if only the unit wasn't so massive and stubborn. On the other hand, I had basically nothing that would be able to engage the Warriors, even if they got smashed by my shooting.
Behind Harry's lines, things were happening. The Wardancers actually did decide to charge the Gyrocopter to make it go away. It fled, and went even slower than my Warhawks had - 2". It was very impressive - another inch and it would have passed through the Hammerers and escaped. Apparently fleeing with flyers was a bad idea in this game. Speaking of flyers, my Eagle is gone. I was about to blame the Cannon, but I remember now. He had sacrificed himself by landing right in front of the Hammerers to stop them charging the Dryads (who couldn't get out of range and can't flee). Lest we forget your noble sacrifice, brave Eagle (well, I nearly did). The Waywatchers had progressed to shooting the Cannon, but it still had a wound left. Sigh.
At this point, with the Eagle spent and my window upon me, my Forest Spirits bailed on the whole situation. They couldn't hope to even beat the Hammerer unit, let alone break it. So instead they pushed out of their arc, knowing they'd be safe there. The Spellweaver also left the Glade Guard, knowing she could negate 4 wounds thanks to the High Magic lore attribute (and she had a ward save).
This is the last photo I have. The Glade Guard put one more volley into the Warriors, who decided not to charge at that point, given they were down to only a single row of guys. The Hammerers couldn't reach either, and gave up. The Waywatchers finally ended the Cannon, but it had already had its fun.
It was right at the end of the game that Harry suddenly realised he'd never brought on his Miners, so they appeared in the final turn, too late to contribute (and too late for me to try to kill them). I believe he had "Miners" written on his arm in big angry letters for the rest of the event. I didn't do it to him , I swear.
If I made a mistake laying into the Warriors instead of the Hammerers, I probably made another compounding mistake near the end when I stepped out with the Spellweaver and tried to avoid combat by stepping back with the Glade Guard. Possibly also when I declined to charge them with the Dryads and played it safe instead. By making all these decisions, I denied myself any realistic prospect of getting points out of the unit. Sure, they'd be crippled. But they were never likely to be wiped out by the shooting. Given the Spellweaver could negate 4 or 5 wounds by the end, she probably could have stayed in the Glade Guard unit, and out-fought the small number of Warriors they would have had left in the last turn (if Harry had still decided to charge).
Any charge on my part would have been a gamble, however. The Hammerers were right there, and even if you can beat a Ld10 unit with a BSB next to it, there's no guarantee you can break it. In playing for points I might well have lost more. I had opted to be boring and played it safe. Unfortunately, the Cannon had taken a real toll on my army and as a result, I had lost the game anyway.


No comments:
Post a Comment