
I'm making progress on my painting, I promise!

Honestly I have sat down several times to try to make progress on my target for this month (just the old Anvil of Doom), but I made the potentially fatal mistake of starting with the banners. It hasn't killed me yet, but it's still on the cards...
Importantly, I made them as difficult for myself as possible. I made them out of slightly curled plasticard, attached to the brass banner poles using some plastic tubing and plastic cement. So they're constructed OK, but they're a far cry from trying to paint a piece of paper. And then I was dumb enough to decide that I wanted to do a design based on what was in the 4th edition army book...

What you can see above is actually already the result of multiple attempts using different approaches. I probably should have started with a white undercoat, which is what I ended up doing in the middle of the one on the right... Except that's an undercoat that's over the coat that's on top of the actual undercoat...

Where they're at now...
In truth, struggling with something like this can suck a lot of your enthusiasm up, and I've spent most of my evenings recently playing the new Warhammer Total War. I'm having fun running around Cathay as an immortal dragon, but it's not doing wonders for my painting progress.
On the weekend we did manage another game using our slow grow forces. This time I faced off against Nick's Beastmen, and decided I would learn from my previous efforts and alter my list. I dropped one of the bolt throwers, and spent a few points adding +1T and +1W to the thane leading my army. I figured this would give him a much better chance of contributing to the battle. Well, this is what happened...

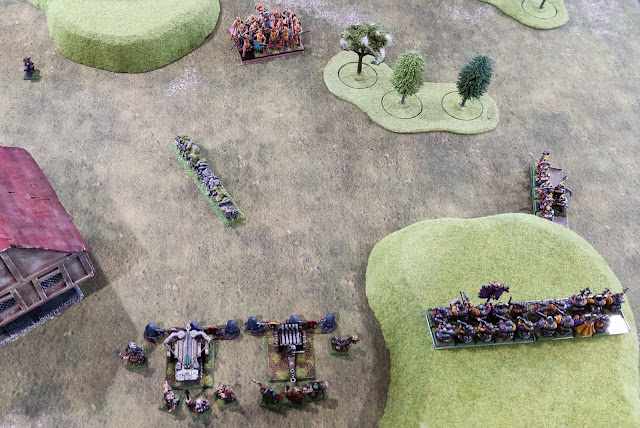
I won the roll-off for sides, and tactically chose the side I was already sitting on. Laziness is a valid tactic. The sneaky chaos hound units both vanguarded onto the field after we had finished deployment.

I put the hammerers on the flank, in the hope that they might actually get to do something this game. That's a cockatrice up the back - Nick was using the 8th edition army list from the Warhammer Armies Project rather than the old official army book from the end of 7th edition.

Putting the thunderers on the hill gave them good lines of sight, but my war machines might suffer a bit as a result. The doggies found a nice hiding place in the forest after their vanguard, putting them in a good place to cause mischief.

That's a ghorgon on the flank, with a spawn to keep it company.

I ended up putting my thane in with the miners on the flank. They were one of my two theoretically main combat units (tiny as they both were), so it might give him a chance to contribute.

I had +1 to the roll-off for first turn, so of course I lost. On the bright side, I rolled the maximum result for how much my army hated the enemy, so my entire army would benefit from Hatred. The Beastmen had been naughty and their crimes had obviously been recorded in our Book of Grudges. Anyway, having won the first turn, the vanguard doggos couldn't charge, so this unit settled for bounding forward and standing right in the grille of my hammerers.

The trolls moved up, making sure they stayed within the mighty Leadership 7 bubble of Nick's shaman general. It was enough in the first turn...

The dogs in the forest elected to stay there. I thought Nick had decided to use the cover and wait until they could charge out, but it turns out he had just forgotten them. Only 1000 points and he can't keep track of all his units. It's just sad, really...

The ghorgon carefully ensured that the miners would need to roll a 9 to charge him. Great judgement and control from a rage-fuelled murderbeast.

The hammerers had little choice but to charge the hounds right in front of them, so they dutifully did so.

The ghorgon's judgement turned out to be imperfect after all when I decided to charge anyway, and made the roll!

Aha! Now we see who's best!

Right. So. The problem with great weapons is that they're a little slow to swing. My glorious charge involved arriving in a mad rush, then beginning to swing in slow motion whilst the ghorgon started to mash my troops. He crushed 3 of them with his normal attacks, then bent down and swallowed my poor thane whole! Turns out extra toughness and wounds do you no good at all against a Killing Blow attack... He never even got to swing... Then the beast Thunderstomped a couple more guys, even as they finally swung and did 4 wounds to him. Oh well, at least I was Steadfast... Obviously I failed the test anyway. I think I rolled a 12. At least I got away, because the ghorgon is slow at pursuing because he has to stop and smell the roses/sample the corpses.

The combat on the other flank went better. The chaos hounds failed to bring down any of the hammerers, and then they got utterly obliterated in return. I tried for the big glorious overrun into the cockatrice, but only ended up stuck partway over a wall.

That's what you get for enthusiastically overrunning toward the enemy. The chariot suffered no ill effects from driving through the wall, but at least it would have a penalty to hit (as far as we could tell from the obstacle rules - who even uses obstacles, anyway). The cockatrice didn't need to touch the wall, so was free to swing properly.

In my turn, I had defied expectations by splitting my fire all over the place. The flaming bolt thrower pinged the trolls, but I then ignored them so the organ gun could wipe out the hounds in the forest, which panicked the ungor and general. Because this was so effective, it left the thunderers free to fire on the spawn, and they did just enough to remove it. At the time I thought I might be saving the miners from being flank-charged as they fought the ghorgon. Silly me. Anyway, with that all done, the trolls tested for Stupidity on their own leadership and failed, shambling slowly toward my lines. The ungor rallied, and happily would still be within 12" for the Stupidity test the following turn.
It should also be noted that the Ghorgon is gone from this picture. Given the choice of charging the fleeing miners or the thunderers, Nick elected to go for the thunderers. They stood and shot, and removed his last 2 wounds before he could take more than a step in their direction! This game is so easy when you can roll dice! Why didn't anyone ever tell me?

This combat... did not go well. I feel like the key point of failure was the hammerers failing their Fear test and dropping to WS1. And after they embarrassed themselves in the previous game, too. Cowards! They did manage a single wound to the cockatrice in return and narrowly held their ground thanks to Stubborn. So maybe not a complete disaster, but... Yeah. Less than glorious.

Ah, but the next turn... Once the weaker, cowardly hammerers had been removed, the remainder proved to be made of sterner stuff. I passed my Fear test, lost a single model to enemy attacks, and then the sole remaining dude smashed down the cockatrice, won combat by 1, broke and then ran down the chariot! What a hero! Promote that Dwarf!

Freed from any concerns about approaching ghorgons, the Dwarf shooting was free to concentrate fire on the slowly approaching trolls. They did some damage, but it was never going to be enough to stop them charging my organ gun. However, when the time came Nick measured the distance, found they were 9" away, and promptly rolled double 1s on the charge...
... Which gave my lines another turn of shooting and they made no mistake. The trolls were wiped out, and suddenly Nick was left with just the shaman and his ungor bodyguard. Things were looking grim, and what was worse - the remaining, clearly unstopped hammerer was approaching with murderous intent!

At this point Nick decided there was little point walking into the teeth of the enemy fire, and started backing up instead. The shaman had been trying all battle to take down my engineers with Spirit Leech. Given he also had Soulblight up his sleeve, I had often let Spirit Leech through and trusted to my superior Leadership to keep my characters safe. Thus far it had worked perfectly, and now he changed his target to the approaching hammerer. Thus began a new pattern of Nick casting Spirit Leech on the hammerer, and the hammerer also proving to be made of sterner stuff than his glorious general, and taking no wounds.

He's coming for you. Your fate is already decided.

Each turn the ungor backed up, and each turn the shaman threw Spirit Leech. Each time it would either be dispelled or shrugged off by the hammerer, and he would get ever closer to his quarry...

And finally, in the last turn, the shaman's destiny was fulfilled. The hammerer charged in all by himself as the miners failed to make the distance...

...And he was felled at the last, unable to pass the 5+ armour save he needed in order to take his swing at the shaman. So close. So sad....
Despite the end only having been almost glorious, the battle overall had gone very well. I had been very lucky not to lose the organ gun to the troll charge, and was also fortunate not to have had to deal with the ghorgon in combat thanks to the miners doing just enough to weaken him for the stand and shoot volley. Nick's general had been pretty ineffectual, even if his very poor Leadership had been almost enough for the trolls (though clearly not enough for Spirit Leech).
The hammerers were almost glorious, after being nearly wiped out on the charge. I clearly need some larger combat blocks. Good thing I'm painting an Anvil then, hey. If I even get that done at this rate...
No comments:
Post a Comment