This is the fourth part of my report from the recent Snake Eyes Warhammer: The Old World tournament. You can find the previous part of the report here, or go back to the start here.
After Round 3 there was dinner at the venue, followed by Warhammer-themed trivia contest. This was fun, with a range of questions based on the background fluff, or things like "list all the special rules for a Night Goblin regiment", plus silly bonus "mathhammer" rounds where they got the teams to propose things like a combo to generate maximum possible combat resolution from a Slann in a round of combat, or the maximum possible distance a unit could travel in a single movement phase.
After Round 3 there was dinner at the venue, followed by Warhammer-themed trivia contest. This was fun, with a range of questions based on the background fluff, or things like "list all the special rules for a Night Goblin regiment", plus silly bonus "mathhammer" rounds where they got the teams to propose things like a combo to generate maximum possible combat resolution from a Slann in a round of combat, or the maximum possible distance a unit could travel in a single movement phase.
The whole thing was a good laugh, and in the end we won the trivia by the narrowest of margins after being forced into a tie-breaker where I had to go head-to-head with Chris (captain of the other leading team) to recite the profile of a Warpfire Dragon (something chosen at random by the organisers).
Anyway, the following morning we were back for Round 4. After a good win in the previous round, we were now probably working our way back up into the middle of the field.
Round 4: Optimised Jank
Daniel Yam (C)
Warriors of Chaos
Michael George
Dwarfs: Expeditionary Force
Ben Hannan
Beastmen Brayherds
- Chaos Lord (Big Barry) [597 pts]
- General
- Shield
- Mark of Nurgle
- Chaos Dragon
- Ogre Blade
- Enchanting Aura
- Favour of the Gods
- 6 Chaos Warhounds [41 pts]
- Vanguard
- 5 Chaos Warhounds [35 pts]
- Vanguard
- 4 Chaos Knights [130 pts]
- Champion
- Lances, Shields
- Mark of Khorne
- 5 Chaos Knights [161 pts]
- Champion
- Lances, Shields
- Mark of Khorne
- 7 Forsaken [133 pts]
- Forsaken by Slaanesh
- 3 Dragon Ogres [189 pts]
- Great weapons
- Heavy armour
- 6 Chosen Chaos Knights [336 pts]
- Champion [Brazen Collar + Charmed Shield]
- Standard Bearer [Icon of Darkness] Musician
- Lances, Shields
- Full plate armour
- Mark of Nurgle
- Drilled
- Warpfire Dragon (Wide Wallace) [374 pts]
Michael George
Dwarfs: Expeditionary Force
- Engineer Sapper [128 pts]
- General
- Handgun [Master Rune of Bursting Flame, Rune of Rapid Fire]
- Runesmith [145 pts]
- Full plate armour
- Shield
- 3 Rune of Spellbreaking
- Engineer [108 pts]
- Handgun [Rune of Rapid Fire, Rune of Accuracy, Rune of Molten Steel] [Rune of Stone]
- Engineer [118 pts]
- Handgun [Rune of Concussive Force, Rune of Rapid Fire]
- [Rune of Stone]
- Expeditionary Marksman
- 2 Scout Gyrocopters [120 pts]
- 2 Scout Gyrocopters [120 pts]
- 10 Thunderers [125 pts]
- Veteran(champion) [Handgun] Shields
- Expeditionary Marksmen
- 10 Thunderers [125 pts]
- Veteran(champion) [Handgun] Shields
- Expeditionary Marksmen
- 10 Rangers [156 pts]
- Ol’ Deadeye(champion) [Crossbow] Crossbows, Throwing axes
- Great weapons
- Shields
- 2 Gyrocopters [130 pts]
- Brimstone guns
- 2 Gyrocopters [130 pts]
- Brimstone guns
- 2 Scout Gyrocopters [120 pts]
- 2 Scout Gyrocopters [120 pts]
- Cannon [120 pts]
- [Rune of Reloading, Rune of Forging]
- Cannon [115 pts]
- [Rune of Forging]
- Organ Gun [120 pts]
Ben Hannan
Beastmen Brayherds
- Great Bray-Shaman [325 pts]
- General
- Level 4 Wizard [Elementalism]
- Tuskgor Chariot
- Hagtree Fetish
- Talisman of Protection
- Great Bray-Shaman [270 pts]
- Level 4 Wizard [Elementalism]
- Tuskgor Chariot
- Earthing Rod
- 6 Gor Herd [48 pts]
- Ambushers
- Tuskgor Chariot [85 pts]
- Tuskgor Chariot [85 pts]
- Tuskgor Chariot [85 pts]
- Razorgor Herd [52 pts]
- Razorgor Herd [52 pts]
- Razorgor Herd [52 pts]
- Razorgor Herd [52 pts]
- 3 Dragon Ogres [189 pts]
- Great weapons
- Heavy armour
- 3 Dragon Ogres [189 pts]
- Great weapons
- Heavy armour
- Razorgor Chariot [120 pts]
- 5 Harpies [55 pts]
- Gigantic Spawn of Chaos [170 pts]
- Spawn of Nurgle
- Gigantic Spawn of Chaos [170 pts]
- Spawn of Nurgle
What were these lists? Admittedly the Chaos one looked like things we'd seen before (with the exact same Dragon again), but the Beastman list was a monstrosity with all 8 levels of the team's magic, and the Dwarf list had 12 Gyrocopters. Well, I guess they did call themselves "Optimised Jank"...
We could not in good conscience give Tim's army (with no magic defence) the Beastmen, so I ended up facing it. Between them the Shamans had 2 copies of Viletide, 2 copies of Wind Blast, and sundry other tricks.
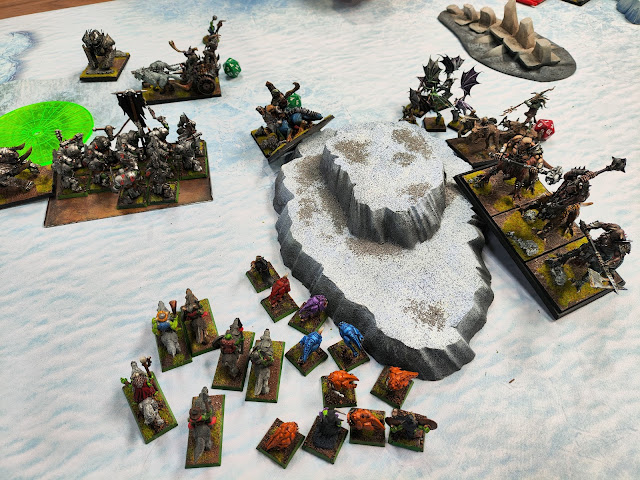
I managed to get the first turn, partly thanks to Ben having about 15 deployment drops. I pressed the Wyvern forward on the flank, aware of the fact that it looked like the unit most likely to be able to cause trouble.
I had both of the Giants on the right flank, but I wasn't really sure how I was going to deal with the Dragon Ogres. I was also wary across the board of moving into a position where a single unit could get slammed by several chariots at once.
Ben didn't actually move a whole lot in his turn. I think his general plan was to buy time and hammer me with magic, then charge me when I got close enough. I believe the Mangler Squig died to a nasty Wind Blast, but otherwise I weathered the first wave of magic reasonably well.
In my second turn, the Night Goblin Big Boss rolled a massive distance for his bouncing Squig and crashed into the Tuskgor Chariot over on that flank. He nearly killed it, but was unable to finish the job and it refused to break. He succumbed in a later turn, leaving the Chariot functional on its last wound.
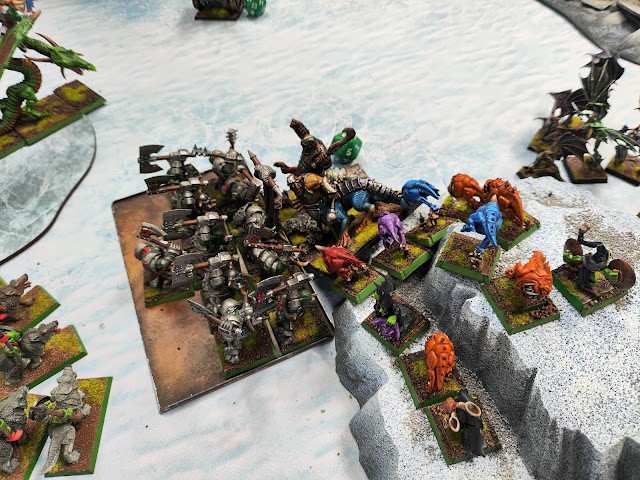
I swung the Giants in toward the centre, away from the second Dragon Ogre unit. Of course I had to engage the one that was closer to the centre, and just hope that between them the Giants would roll some attacks that helped me work my way through the unit. I also closed with my main battle line, knowing that the combination charges of the Chariots would be unavoidable, but that I had Fanatics to release before that happened.
The Wyvern declared a charge on the Chariot on the end of the line, and I think we messed up by making it take (and fail) a terror test. I hadn't processed it was a Razorgor Chariot, and hence caused fear itself. Anyway, no real harm was done. It didn't go off the table, and rallied in its next turn. I redirected into the nearest Gigantic Chaos Spawn, whilst the Boar Boyz went into the other one. I knew I couldn't kill either of them on the charge, but it meant they'd both be individually busy, rather than free to combine their efforts on something.
The Dragon Ogre plan did not go well. The first Giant arrived, failed to do any damage whatsoever with his random attack, and then got killed outright before either side even got a chance to stomp. Naturally the Dragon Ogres then overran and hit my other Giant, and I no longer had any real hopes for his survival. Bit sad. Basically just fed them 400 victory points.
Both Spawn took a decent whack of damage and lost combat. The Wyvern followed up, but the Boar Boyz decided not to. They had a plan.
At this point the Fanatics emerged from the Night Goblins, eyeing off the wall of (rather closely arranged) Chariots...
So when I say the Boar Boyz had a "plan", this was it. They might have been able to bog and duke it out with the Spawn alone, but with all those individual Razorgor waiting to charge in and help, I figured they wouldn't last long. The Wyvern had shown he was not really likely to suffer, even fighting both of the Spawn, so the Boar Boyz waited for the inevitable Razorgor charges, then fled.
The Fanatics rolled pretty well, each of them passing down the join between 2 Chariots. They killed one Tuskgor Chariot, maimed another, and wounded at least the general Shaman. What followed was some mad re-planning by Ben before the Chariots decided they couldn't afford to try the charge and instead took evasive action using Travel Mystical Pathway.
It felt a bit cowardly for the Boar Boyz to simply abandon their Warboss, but he could look after himself. Hopefully. He won the combat against the 2 Spawn, shoving one back and turning to fight one that would give me a good overrun if I killed it in the next turn.
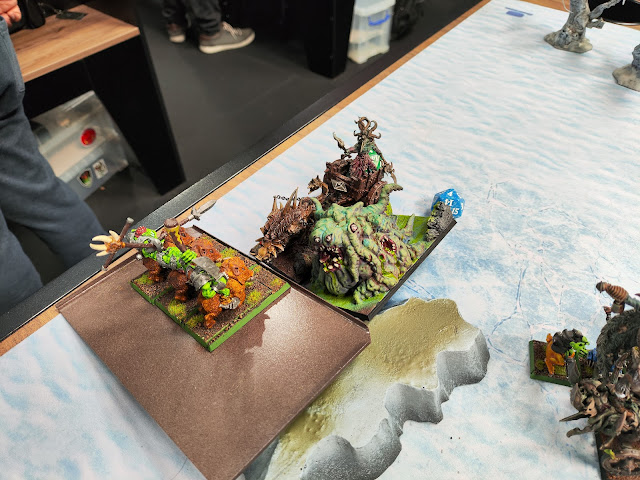
Foot of Gork appeared in the forest, finding a convenient gap between a vast number of individual units. Naturally it rolled a Hit and went nowhere (I hate that FAQ ruling). It had such potential.
Thanks to the general's leadership, the Boar Boyz safely rallied and turned back toward the Razorgor Chariot. I don't think I did this well, however. I think I decided to sit a bit further back than I had to, in order to make it harder for the unengaged Spawn to make it in to help the Chariot. But doing this meant that I didn't get close enough to negate the impact hits of the Chariot. But I was too close to choose to flee again. Too many things to think about, and I think I chose the wrong one. On the bright side, the Squig Hoppers had made it to the nearest Razorgor, nicely in line with the Wyvern's overrun.
The second Giant did indeed die to the Dragon Ogres, but it seems he at least managed to do some damage before he went. The other Dragon Ogres and the Harpies were working their way around the flank, but my lines were contracting away from them, looking to use the hill as cover. I was losing some models from the Black Orcs and Night Goblins to magic, but not nearly as many as Ben was hoping. He did a ton of hits to the Black Orcs with Viletide at one point, but just couldn't roll the 6s.
The glorious charge of the Squig Hoppers was successful, with the assistance of the Warboss after he had disposed of the Gigantic Spawn. He couldn't overrun for a second time, but he could see straight into the forest that was meant to be offering the Great Bray-Shaman cover...
Things were starting to close in around the centre. The Night Goblins died to the Dragon Ogres (I think they fled to avoid a pursuit into the flank of the Black Orcs, and died either right there, or to the Razorgor coming in from the other direaction).
This was the scenario I probably needed to avoid with the Boar Boyz, but the one I so cunningly orchestrated. Oh well. The Great Bray-Shaman had again teleported out of the forest, looking to get out of line of sight of the Wyvern (probably sensible, if a bit sneaky and unsporting).
Look at all that traffic. Units all over the place. Still, it felt like I was the one making the running - the character Chariots were trying to avoid me, and half the Razorgor were offering slingshot opportunities rather than threats. Having sacrificed the Night Goblins to save the Black Orcs from the Dragon Ogre flank charge, I was rewarded by watching the Razorgor do nothing on its own, and run away. The Black Orcs restrained pursuit, reformed to get their corner really close to that Shaman in his Chariot, and wait for their turn...
So the Shaman fled from the charge (hardly surprising), and whilst avoiding getting off the table, he managed to ensure he was far enough away that we weren't going to get there. So instead we redirected into the damaged Dragon Ogre unit as the Squig Herd charged them in the flank.
So the best that can be said for this combat is that we didn't just break and die immediately. But there was no way they were coming back from this.
This was a key moment in the game. The Wyvern had cleared out of the way with a charge, which meant the Squig Hoppers had a clear line to the flank of the general Shaman. They rolled well enough to get everyone in, and things were looking up.
The Wyvern had charged the Razorgor in the edge of the forest, who had fled to avoid me using him as a slingshot toward the fleeing Shaman. So now everyone was running away.
The Dragon Ogres got smashed by the combined charge of my units, and I overran the Squigs out of the path of the fresh Dragon Ogre unit. If they had rolled high, I could have done all sorts of interesting things. Instead they just parked right in front of the Black Orcs.
The Squigs munched enthusiastically on the Shaman, but didn't kill him (I think because of his 5+ ward save). He did nothing much in return, but at least he didn't break. The resistance of the Boar Boyz sadly came to an end, right in time to free up some rescuing units for the enemy...
This did not work out well for me. I actually thought the Dragon Ogres couldn't see because of the second tier of the hill, but when we discussed it, I realised we have never come to an agreement on how it was to be played, and there's no such thing as a 2 tier hill in the rules, as such. I conceded the point rather than arguing it, and as a result the Dragon Ogres squeezed in and then waited for the Tuskgor Chariot and Harpies to smash through the Squigs and into the combat. However, in the background, the fleeing Razorgor rallied, but the Great Bray-Shaman did not - he continued driving his chariot off the table. So that was a big win.
Unfortunately the attack on the other Shaman by my Squig Hoppers was interrupted by a Razorgor and a Gigantic Spawn. Fortunately, they somehow did little enough damage that there were still some Squigs left to have another chomp at the Shaman. And they did, and this time he didn't save it. The Squigs broke and perished, but it was already a job well done.
Some more mistakes were made in this area. I forgot that Squig Herds disappear (and potentially explode) when they break. I also misunderstood how Stubborn works (we assumed being outnumbered for fear would override it), and so after combat the few remaining Black Orcs broke and fled through multiple enemy units and I decided to just remove them.
At this point it was the end of the 5th turn and we were running tight on time. We decided to stop the game, given there wouldn't be time for both of us to have another turn. Realistically we probably would only have collected another small unit or so each (my Wolf Riders and a Razorgor), so it might not have amounted to much. As things stood, the game was a draw. A very bloody one, but still a draw.
Result: 10-10 Draw
In the other games...
Tim: What, a game that doesn't involve 2 dragons?! Hmm, this isn't Warhammer! What Michael’s list lacked in dragon, he certainly made up in gyrocopter… oh so much gyrocopter, and as I forgot, not enough photos.
Given the amount of shooting and avoidance, I figured my best way to get any real points out of the game was to get to the war machines and infantry and ignore the gyrocopters unless opportunity arose. Which is pretty much how the game went: I rushed up, the gyrocopters bravely flew behind my front line and were keeping out of sight of the shaggoth, who was prowling behind (bravely, of course - and not because the cannons had left it on 2 wounds).
The shooting (in particular the organ gun, which removed the knights with two volleys) took a terrible toll on my units, removing all the dogs and horsemen. My lord cleared the war machines and while the dragon ogres made very hard work of it, the unit of thunders with the runesmith also was cleaned up.
One opportunity was given when the rangers bravely flanked and charged the spawn, who took that as a chance to do a free reform after breaking them to look at a brave gyro unit, who the spawn promptly charged and finished off, narrowly falling short of the 10-inch overrun into the next one.
The rest of the game involved the 'copters avoiding the dragon and spawn while I cleaned up the second thunder unit. The Engineer Sapper, which had been playing hide and seek with the dragon ogres, was cornered. He bravely tried to finish off the shaggoth with his gun… and then was bravely introduced to a great weapon which he bravely was dispatched by! So much bravery in this game.
Honestly, this game swung hard to me in the last two turns once I was able to get engaged, and went from a small loss to a decent win.
Result: 15-5 Win
Pete: The Chaos army had a Chaos Lord on a dragon, which was good for the Wizard Lord. Sadly it had the always strike last aura and so the Wizard Lord would instantly die as soon as he got into combat, which was bad. Oh well, there was also a Warpfire Dragon to hunt. I guess that’d do. The rest of the army was a couple of Khorne Chaos Knight units, a Nurgle Chosen Knight unit, a small unit of Forsaken, some Chaos Hounds and some Dragon Ogres.
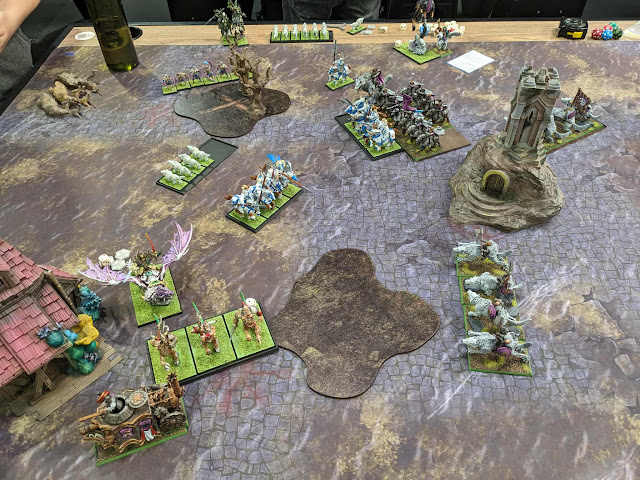
Unfortunately we don't have many photos to work with here, but from what I can see, they deployed as normal...
Then suddenly they were playing length-wise down the table. At least you can see the Wizard Lord catching up to the Warpfire Dragon in the background...
The Steam Tank and small Knight unit held up the Chosen and Dragon Ogres for a while, before the Chaos Lord (who was now Ld10 A7 or something unhinged like that) came along to sort things out. The White Wolves engaged in various bits of dressage and horsemanship to navigate the terrain and Chaos Hounds, and eventually killed off some Khorne Knights. They then failed to reform after an overrun, got charged by the Forsaken as a result and were wiped out to a man.
While this was happening, the Wizard Lord was locked in mortal combat with the Warpfire Dragon:
- The Wizard Lord tries to charge the Warpfire Dragon and fails his Fear test (on the general’s Ld9).
- The Wizard Lord miscasts and loses a wound (leaving him on 3).
- The Wizard Lord tries to charge next turn and succeeds.
- The Wizard Lord fails to cast Spectral Doppelganger because of the dragon’s MR(2) and doesn’t kill it with his mighty two attacks.
- The dragon fights back but only does one wound, mostly because of the -1 to hit from Glittering Robe.
- The dragon stomps the Wizard lord but only does one wound, entirely due to bad rolling. The Wizard Lord is now on one wound.
- The Wizard Lord loses combat but holds, and the dragon follows up.
- They’re both Initiative 3, so they go simultaneously in the next round. The Wizard manages to cast Spectral Doppelganger and kills the dragon.
- The dragon misses entirely.
- The dragon explodes and does one hit that doesn’t wound.
- The Wizard Lord flies away and hides behind a building for the rest of the game.
After all this, the Forsaken kill the Grand Master in another blistering display of killing Blows. I don’t think there was much left other than the Wizard Lord and maybe a Demigryph unit.
Result: 5-15 Loss
Wizard Lord kill count: Necrosphinx, Bastiladon, Carnosaur, Warpfire Dragon
Total Match Result: 30-30
Wow, a complete stalemate overall. A draw for me, and then Pete and Tim's scores managed to cancel each other out perfectly. That was kind of funny.
You can find the next part of the report here.


No comments:
Post a Comment